
PanaForma is a Windows application that makes it easy to capture data quickly and efficiently from PDF form files. Examples are: invoices, receipts, purchase orders, expense reports, surveys — but really any set of PDFs that follow a consistent format.
With PanaForma you define a Template by drawing selections around the data fields you need from a PDF. You then apply that Template repeatedly to as many PDFs as needed. For example, you might define an invoice Template for a supplier using their January invoice, and then with a couple of clicks apply that Template to capture data from their invoices for February, March, April, etc…
Once you've applied your Template to all required PDF files, you can export the captured data to an Excel file, or to a CSV file, or you may copy it to the clipboard for use in other systems.
Read on to learn how PanaForma can help you!
With PanaForma you define a Template by selecting the fields you need from a typical example of a PDF format, for example, an invoice from a given supplier. You can then quickly apply that Template to more files that follow the same format to also capture their data.
PanaForma can open PDF files that are stored on the computer it runs on, or files that are stored in shared network folders to which you have access.
Sometimes a field might not be exactly where you expect it to be on a PDF. No problem! PanaForma allows you to adjust the size and position of every field on every form if needed.
PanaForma also allows you to edit or override data captured from PDFs. For example, on a scanned PDF, a letter/digit might be misinterpreted and need manual correction, or a field value may be absent from a PDF and require manual entry.
Once you've captured the data you need from a set of PDFs, it's time to export it. With PanaForma, you can export whatever rows and columns of the captured data you need to the two most commonly used file formats for tabular data: Microsoft Excel, and Comma-separated-values (CSV) format. You can also copy rows to the clipboard to paste into Excel or any other Windows application that supports pasting of tabular data.
The key feature of PanaForma is the templating system that allows a Template to be applied repeatedly to as many PDF files as needed. If there are a lot of variations in the format of your files, you may need to create many Templates, or do lots of manual fix-ups when capturing data.
At present, PanaForma doesn't have the ability to directly connect to Cloud file storage systems such as SharePoint Online, OneDrive, Box, or Dropbox. If you need to process PDFs stored in a Cloud service, you will first need to sync the files locally, or access the files via a Windows network file share path — if supported by the Cloud service.
PanaForma stores its data on the computer's hard-drive, which makes it very fast to access, but doesn't allow a user to move between different computers while still seeing the same workspace and data on all their devices.
PanaForma isn't a Cloud service, so there is no common store of data that would allow multiple users to participate in the same workspace and see each other's updates in the app.
While PanaForma may be used by a group of users, the users will need another channel to coordinate their work and share the data they capture with each other.
For scanned PDFs, PanaForma uses Optical Character Recognition (OCR) technology to identify letters, numbers, and punctuation. This usually works well for printed content that has been cleanly scanned. However, for hand-written or badly scanned PDFs, it's likely that the OCR will fail to correctly interpret some or all of the text. You can still use PanaForma to process these types of files, but it's likely that you will often need to do manual data entry and corrections.
To begin, we'll look at getting around the PanaForma app, then walk through a typical scenario of capturing data from a PDF, and exporting it to an Excel file.
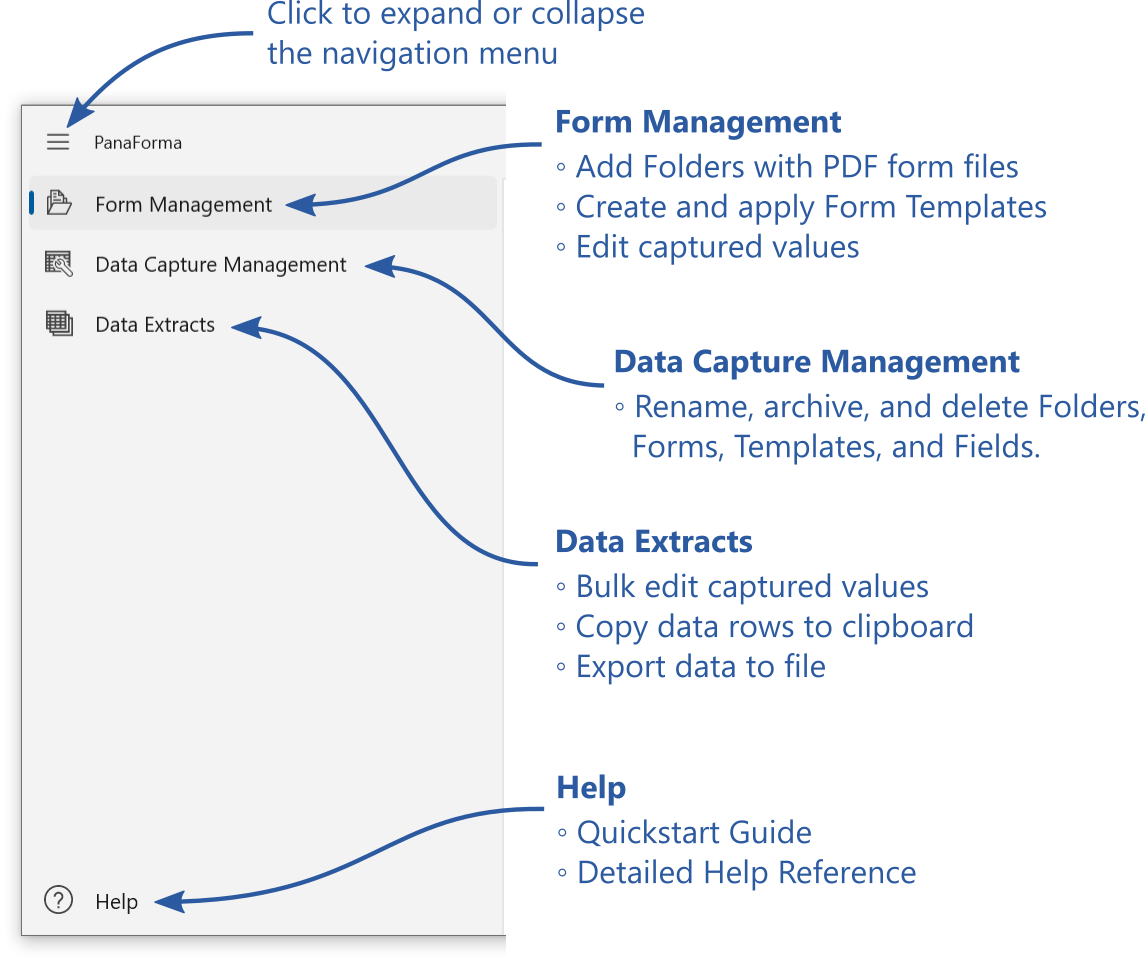
Use the left navigation menu to switch between the main screens in PanaForma. A brief outline of the functionality available on each page is given in the screenshot. You will find more detail on all of these screens in the rest of this Help reference. Remember, you can save space on screen by collapsing the navigation menu down to a narrow bar.
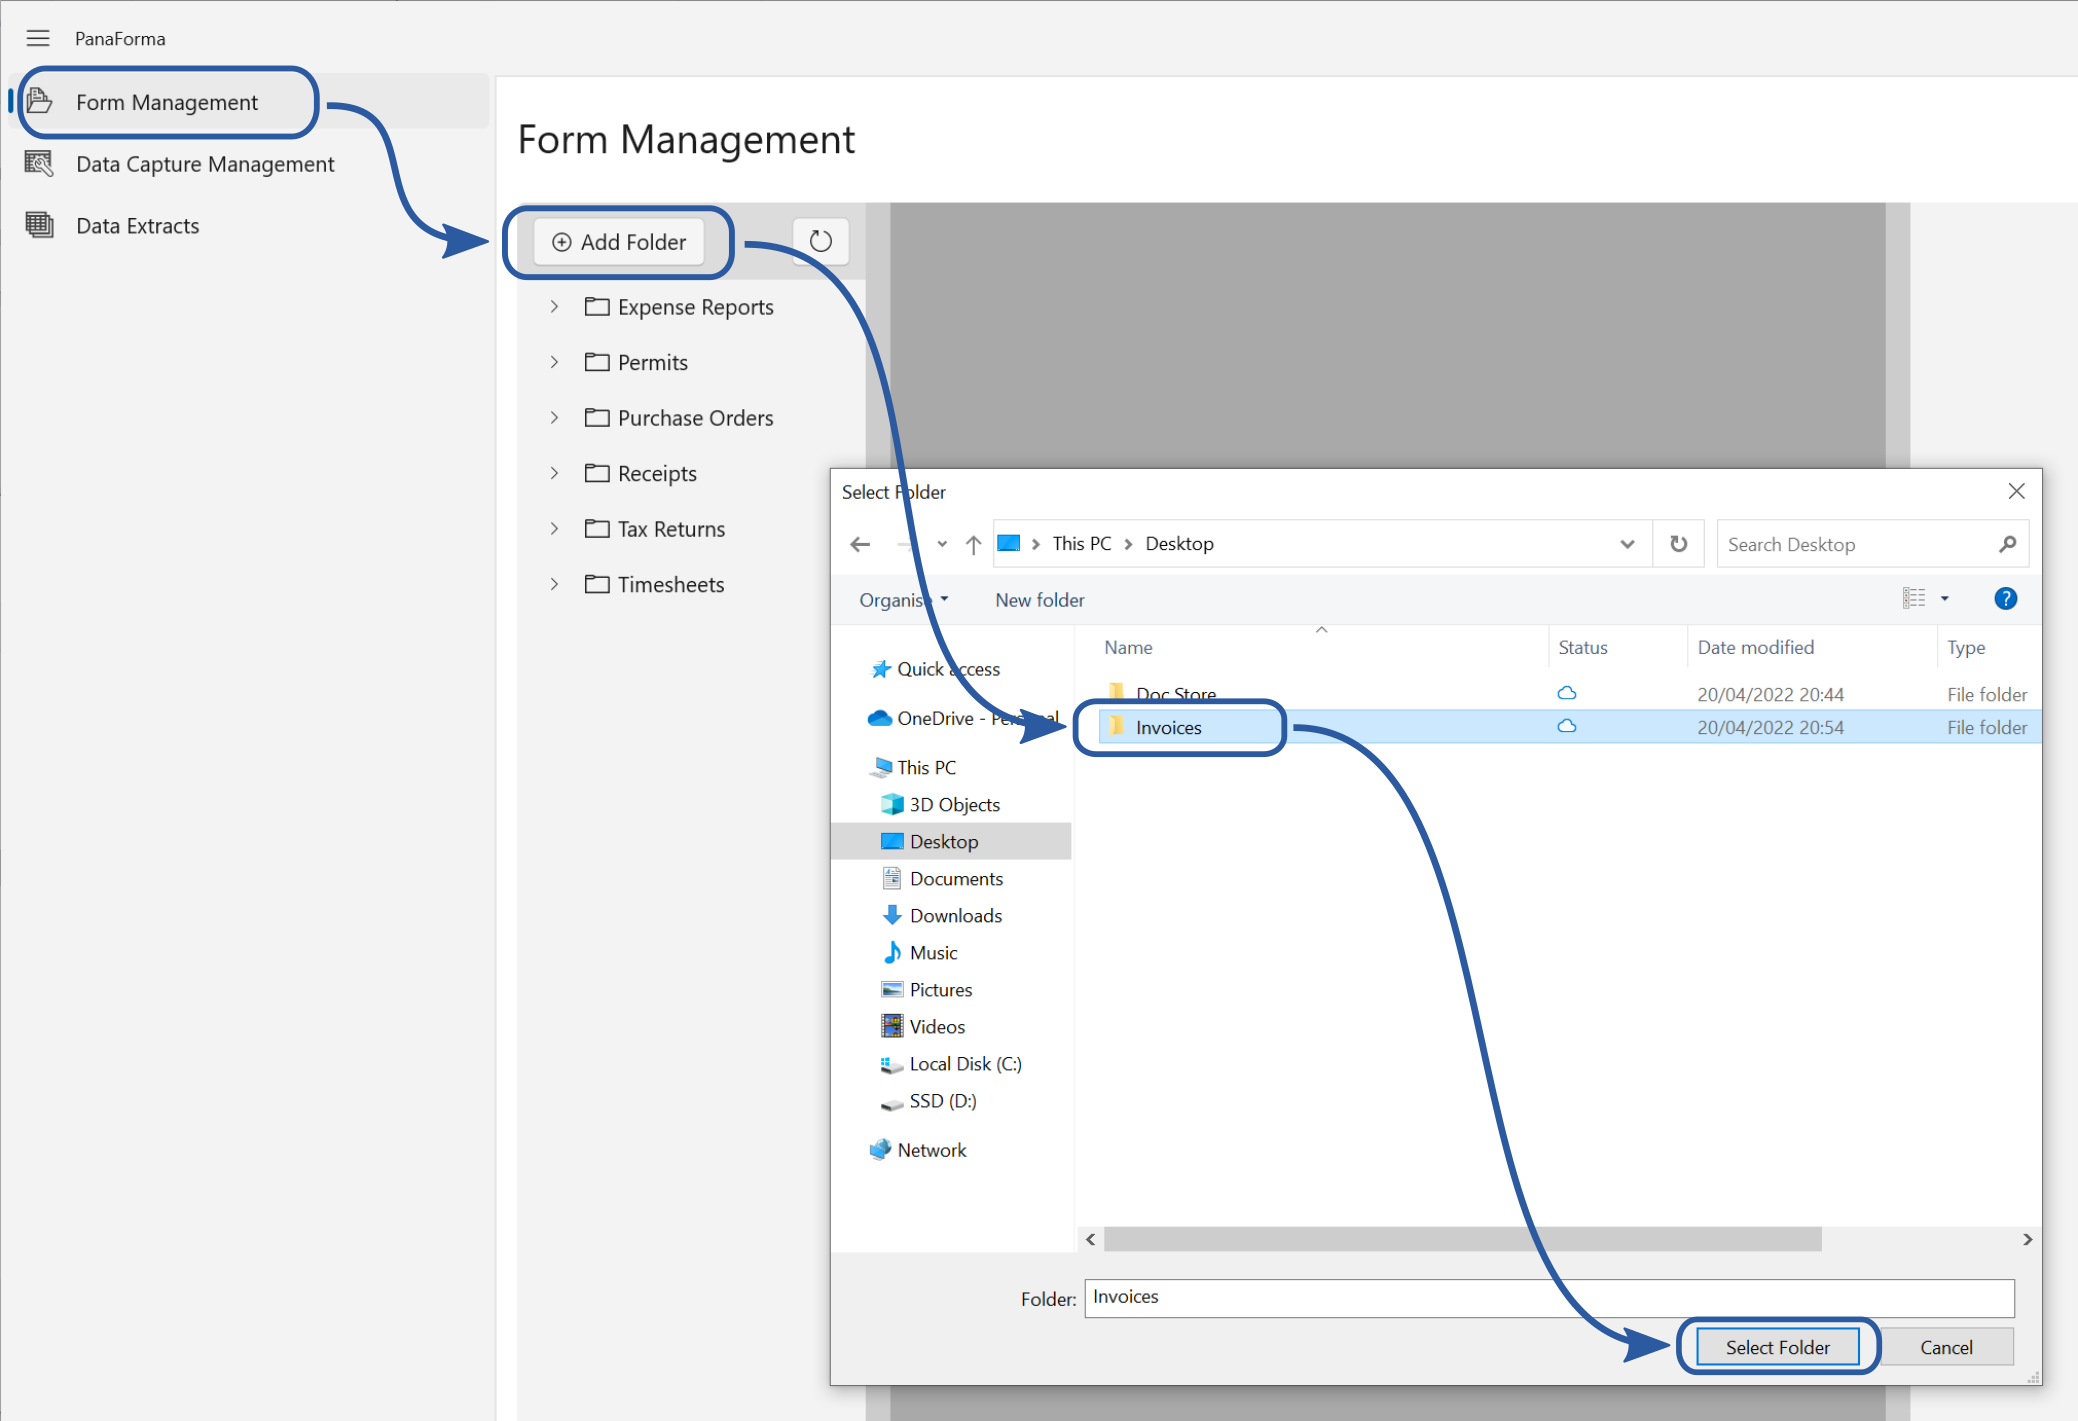
The first thing you'll need to do in PanaForma is to add a folder where you store PDF form files from which you need to capture data. When you add a folder, the files in that folder, and all the sub-folders in that folder will be accessible in PanaForma.
Folders are added on the "Form Management" screen of the app. You can add folders that are on your computer, or shared network folders that you have permission to access.
In this example the user has already added a number of folders, and is now adding an "Invoices" folder
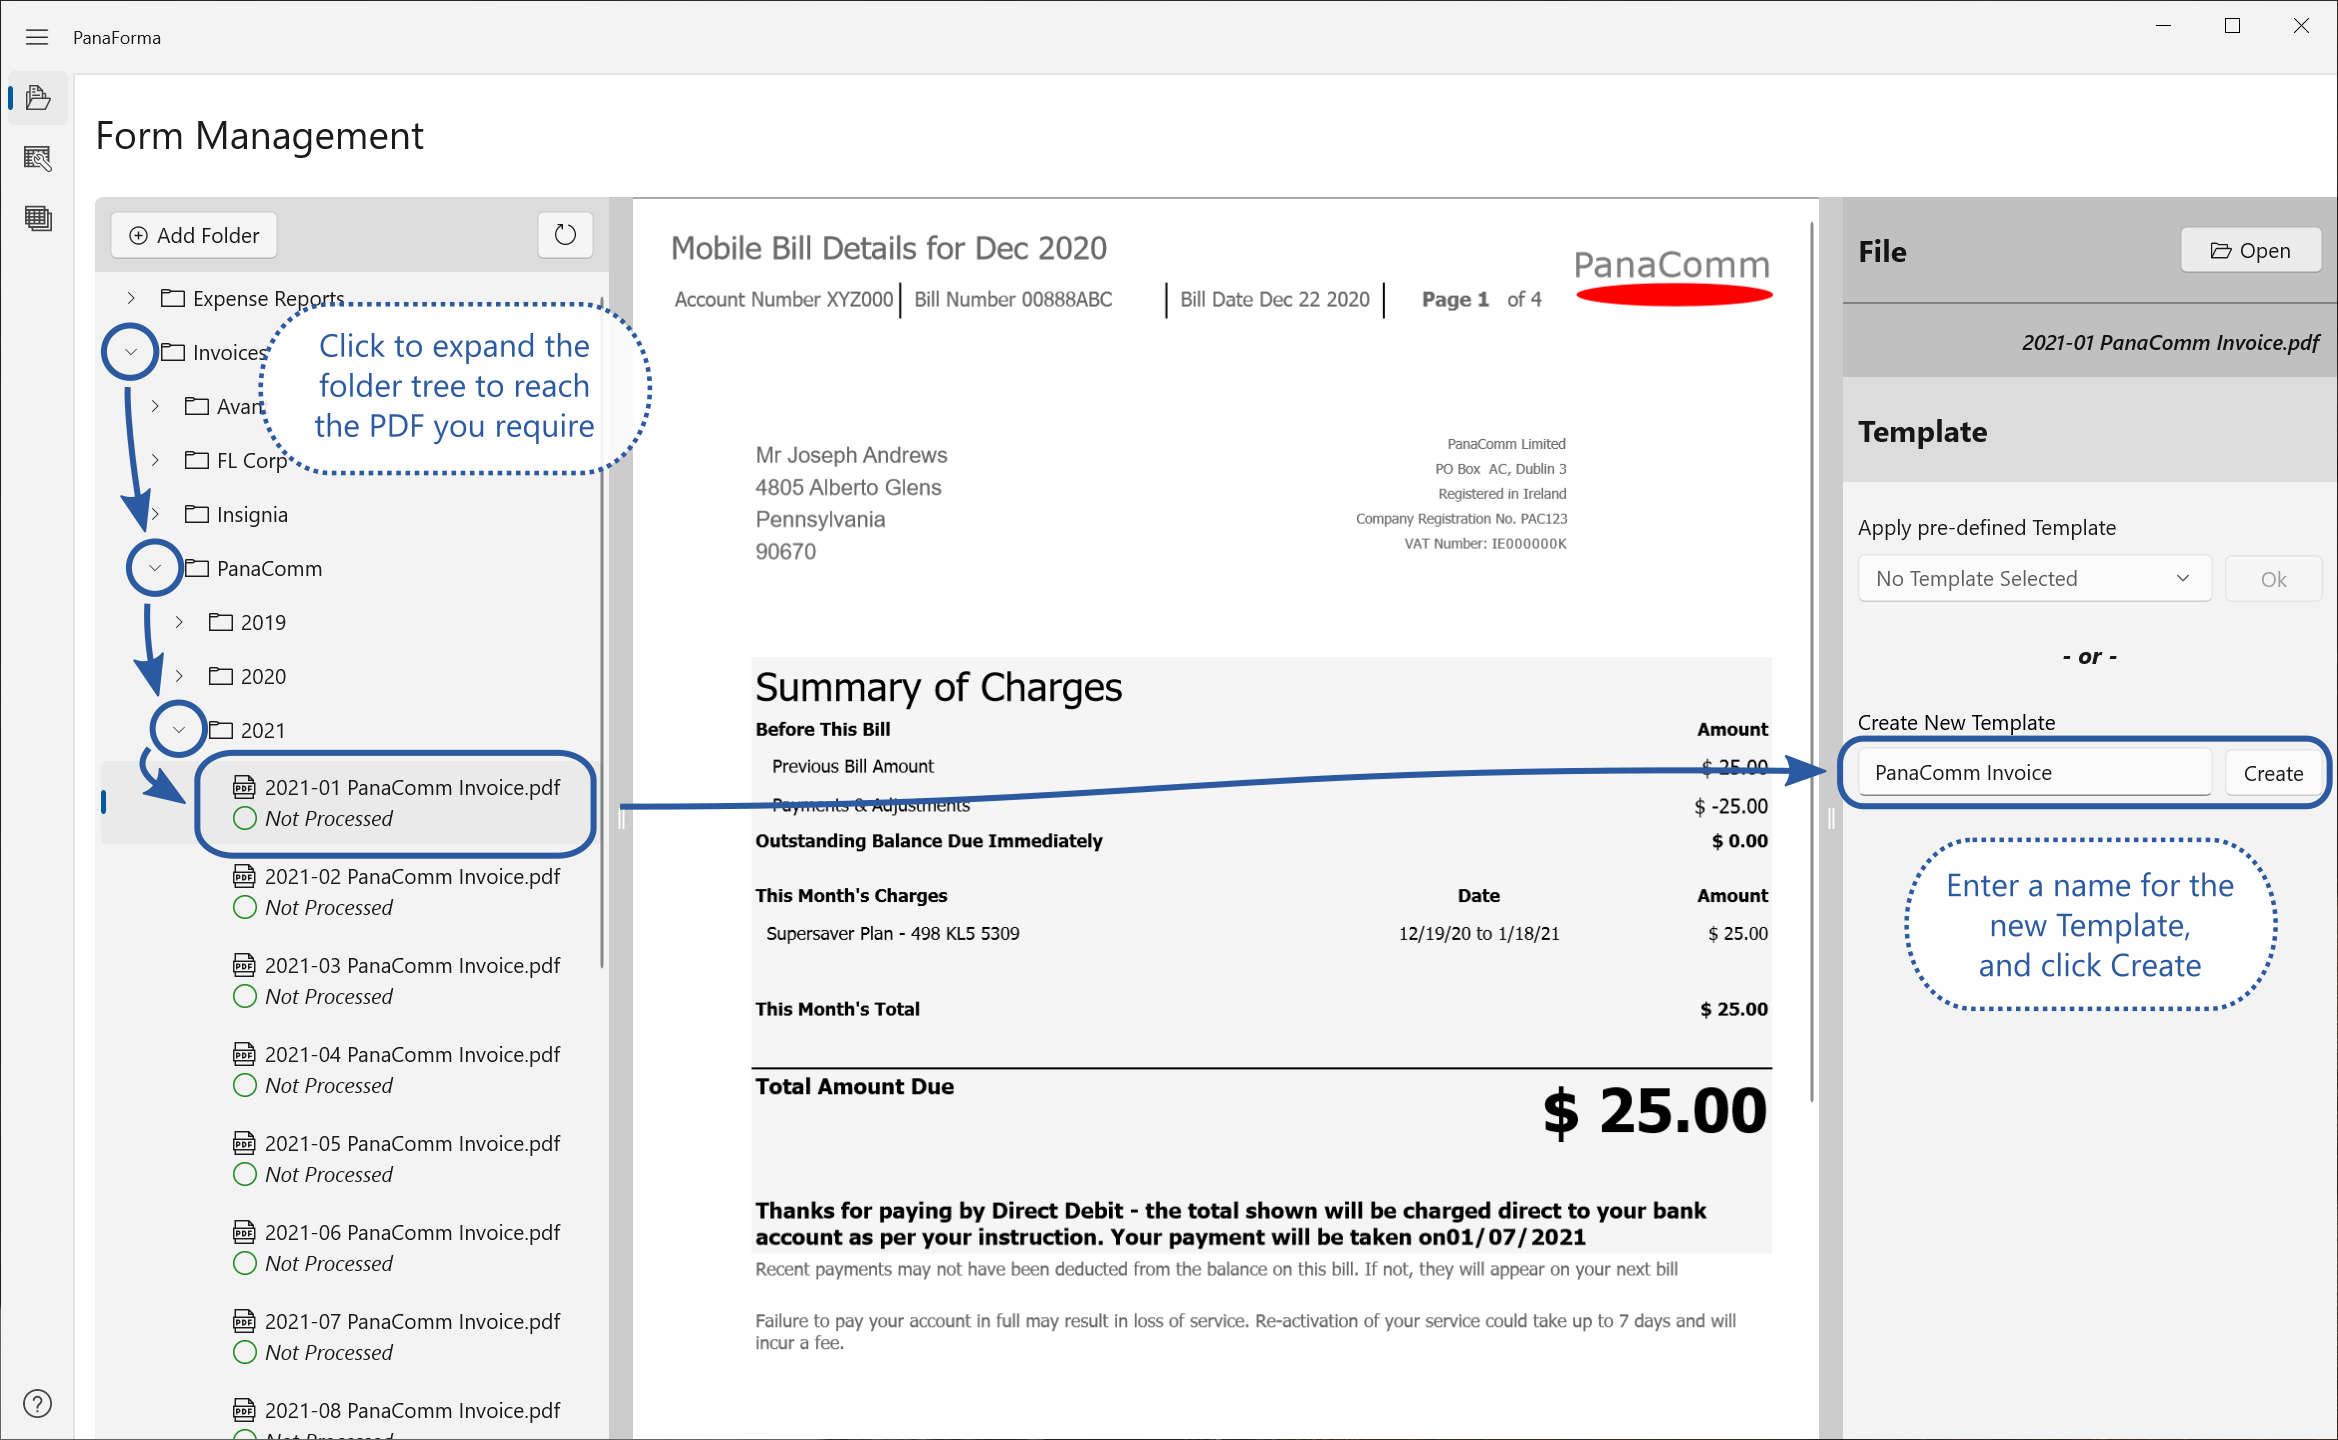
Once you've added a Folder, you'll want to pick a PDF to serve as the Default Template for a type of form. PanaForma works best when forms using the same Template have a consistent layout. The PDF you choose as the Default should be a very typical example of the form type.
In this example the user is creating a new Template for an Invoice, and giving the Template a name that indicates the type of form to which it will be applied.
The next step is to create all the fields you need in the Template. You do this by drawing selections around the values you need from the PDF. To draw a selection, move the pointer over the PDF page and hold down the left mouse button while dragging. Release the mouse button when the selection box covers the required value. You can move and resize the selection after creation if needed.
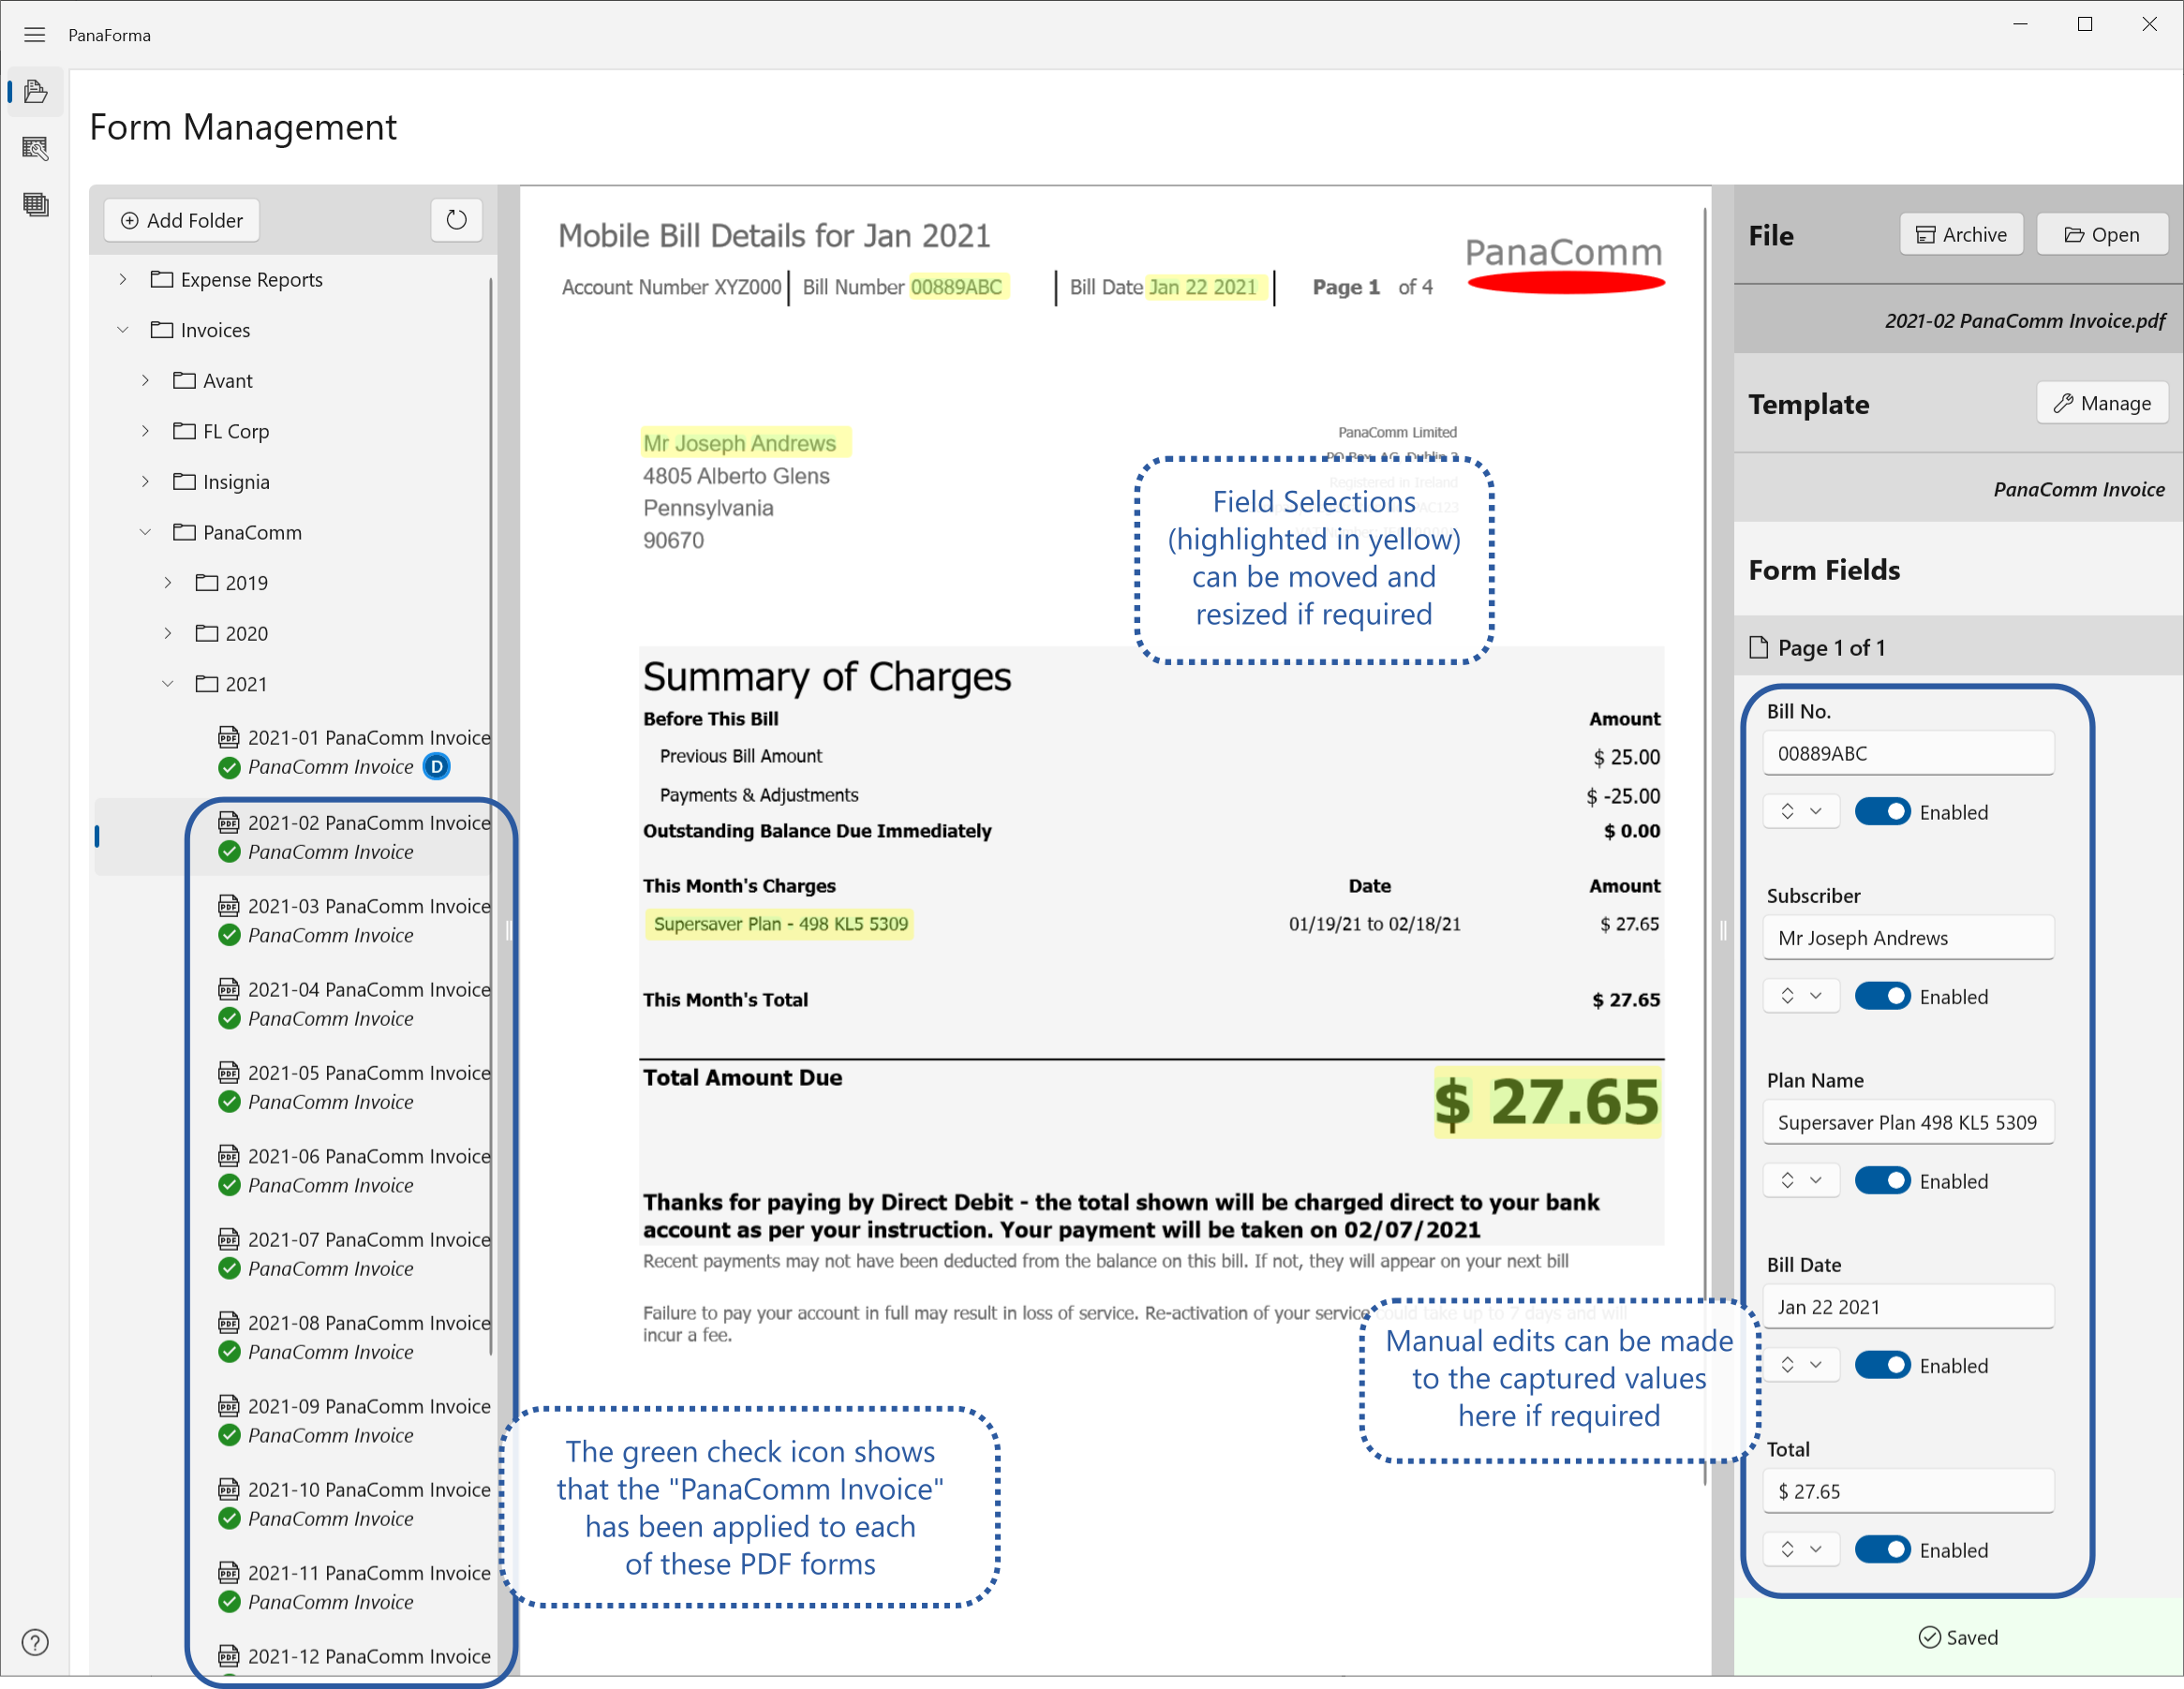
When a field selection is created, the new field will appear in the side bar on the right. In the side bar you can give the field a meaningful name, and make manual changes to the captured field value if necessary.
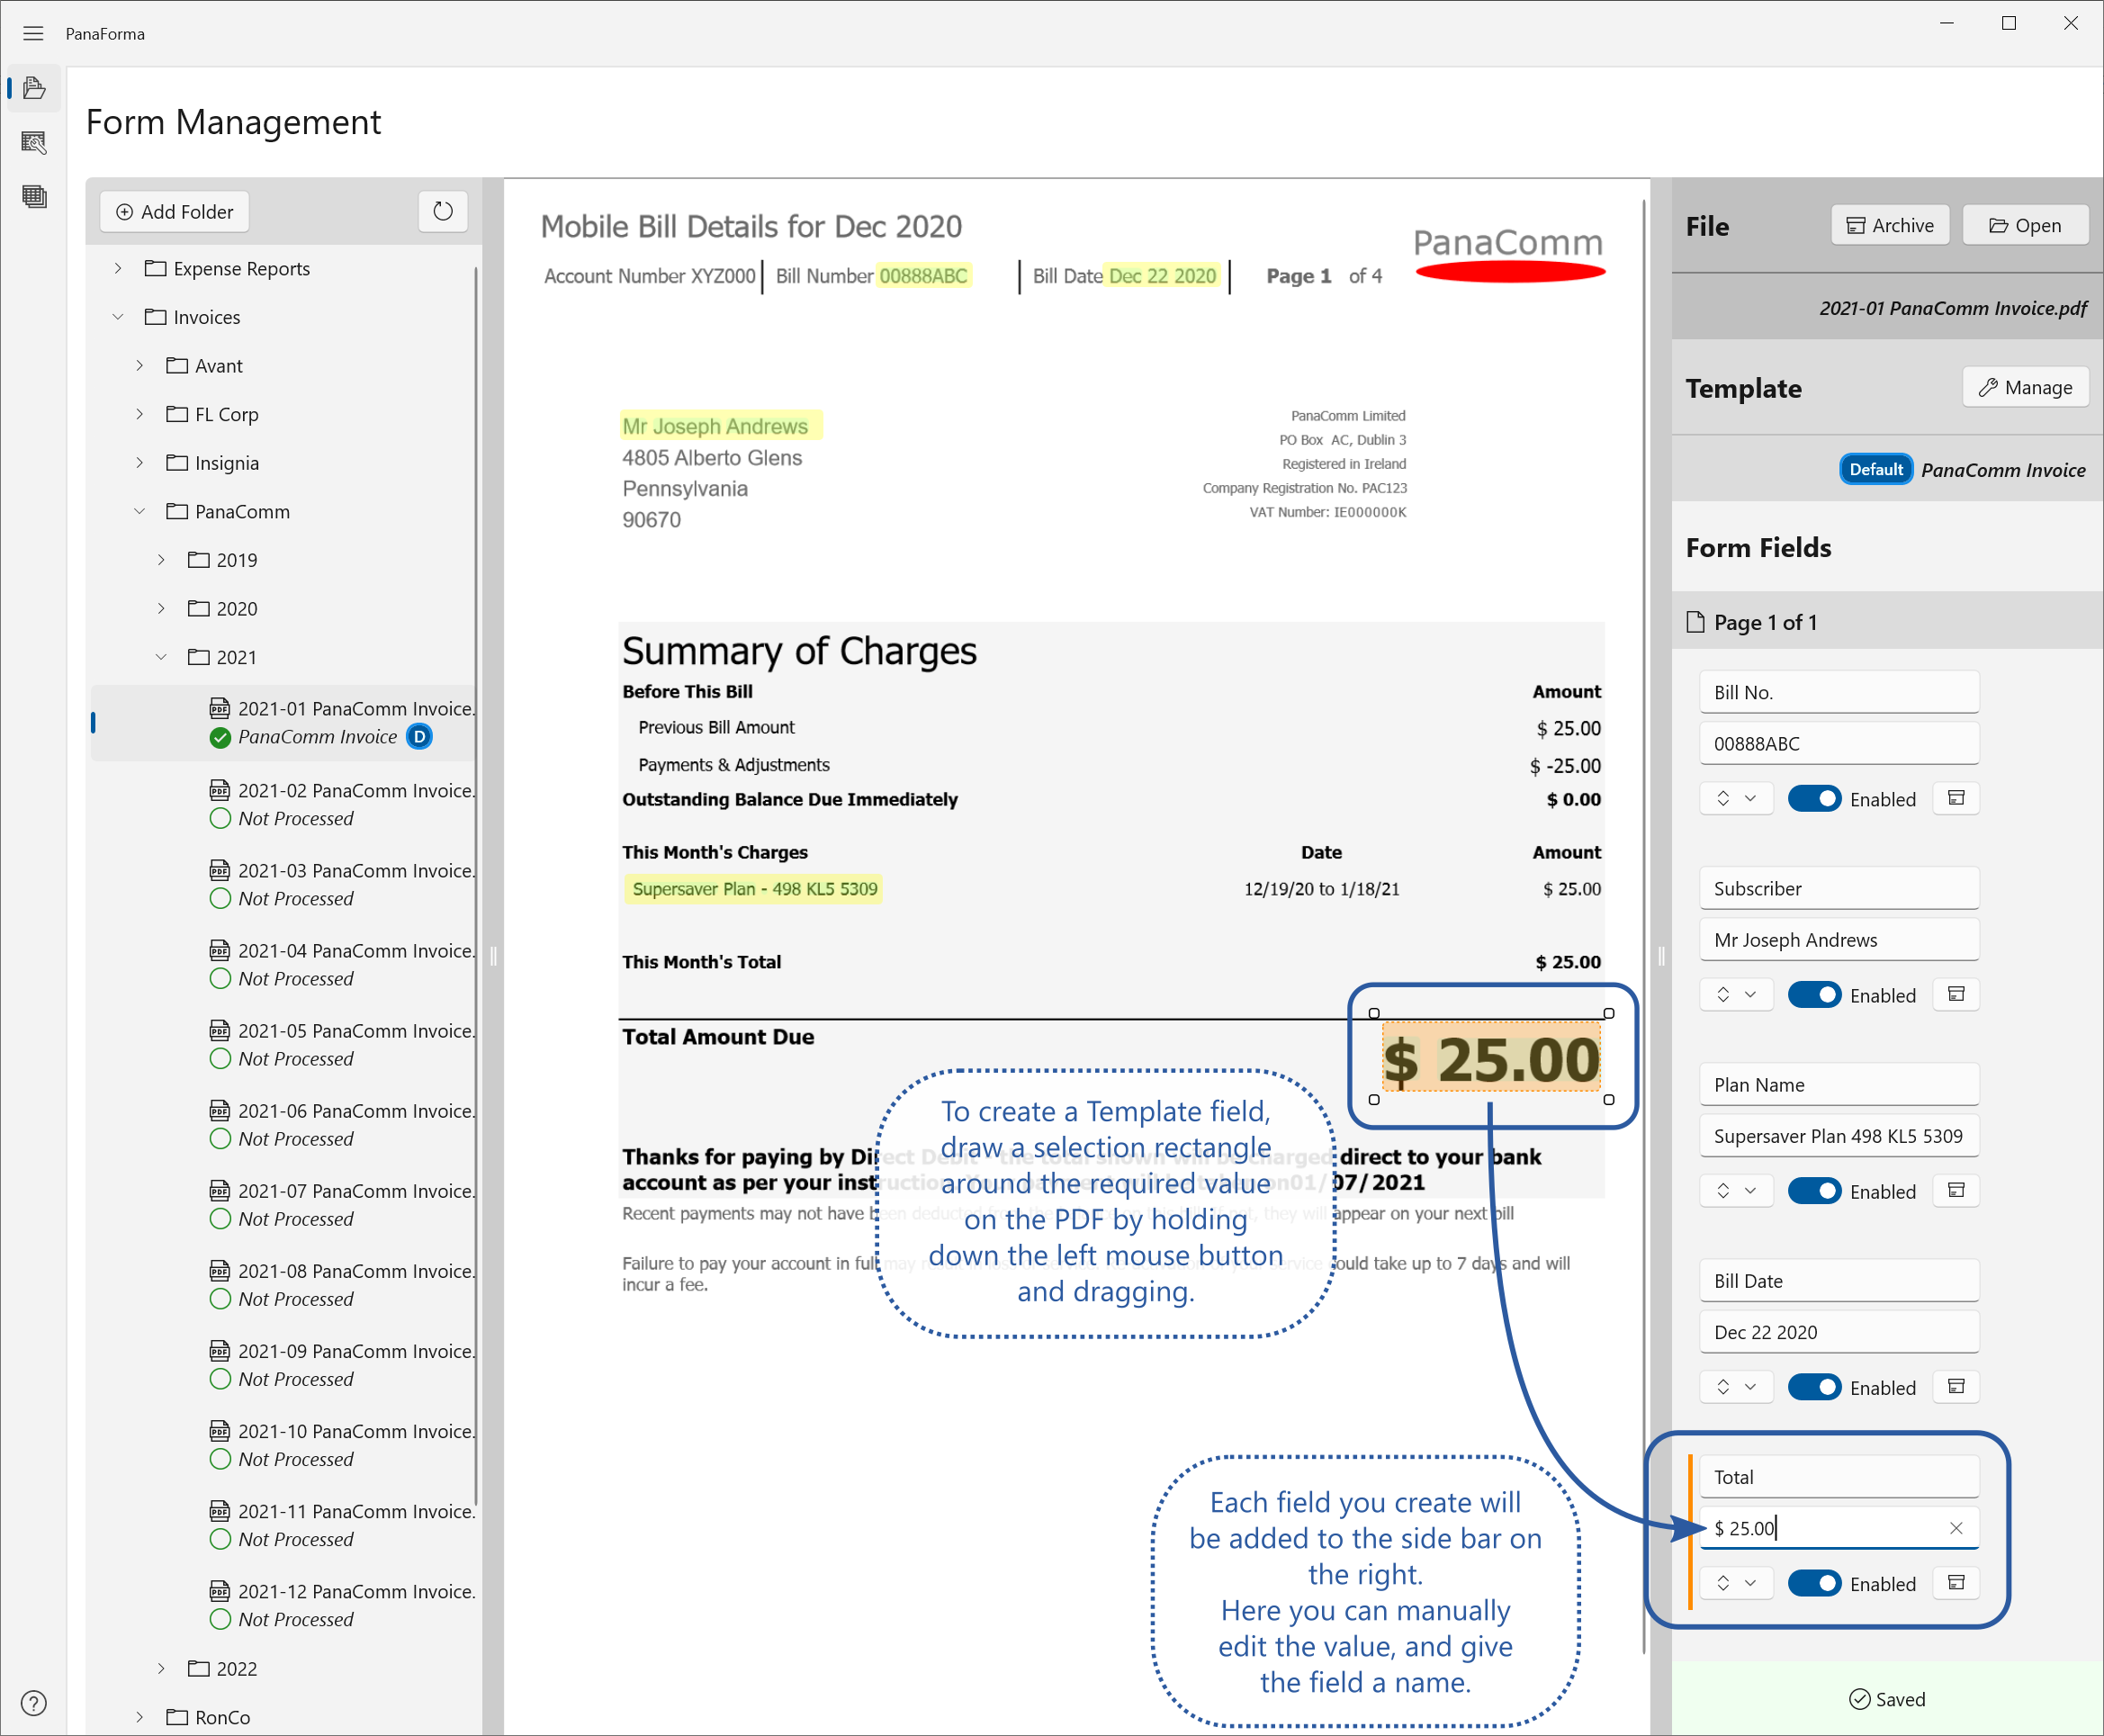
Repeat the process for all the fields you need in the Template. In the example in the screenshot, the user has created five fields for the "PanaComm Invoice" Template. You can see that the field value locations are highlighted in yellow on the PDF page.
Now that you've created a Default Template, it's time to apply it to all the other PDFs of the same type to also capture their data.
There are two options for applying a Template. You can apply it to one PDF at a time, or you can apply it to all files in a folder at the same time.
To apply an existing Template to single a PDF, click the PDF in the folder on the left, choose the required Template from the drop-down menu on the right, and click the OK button.
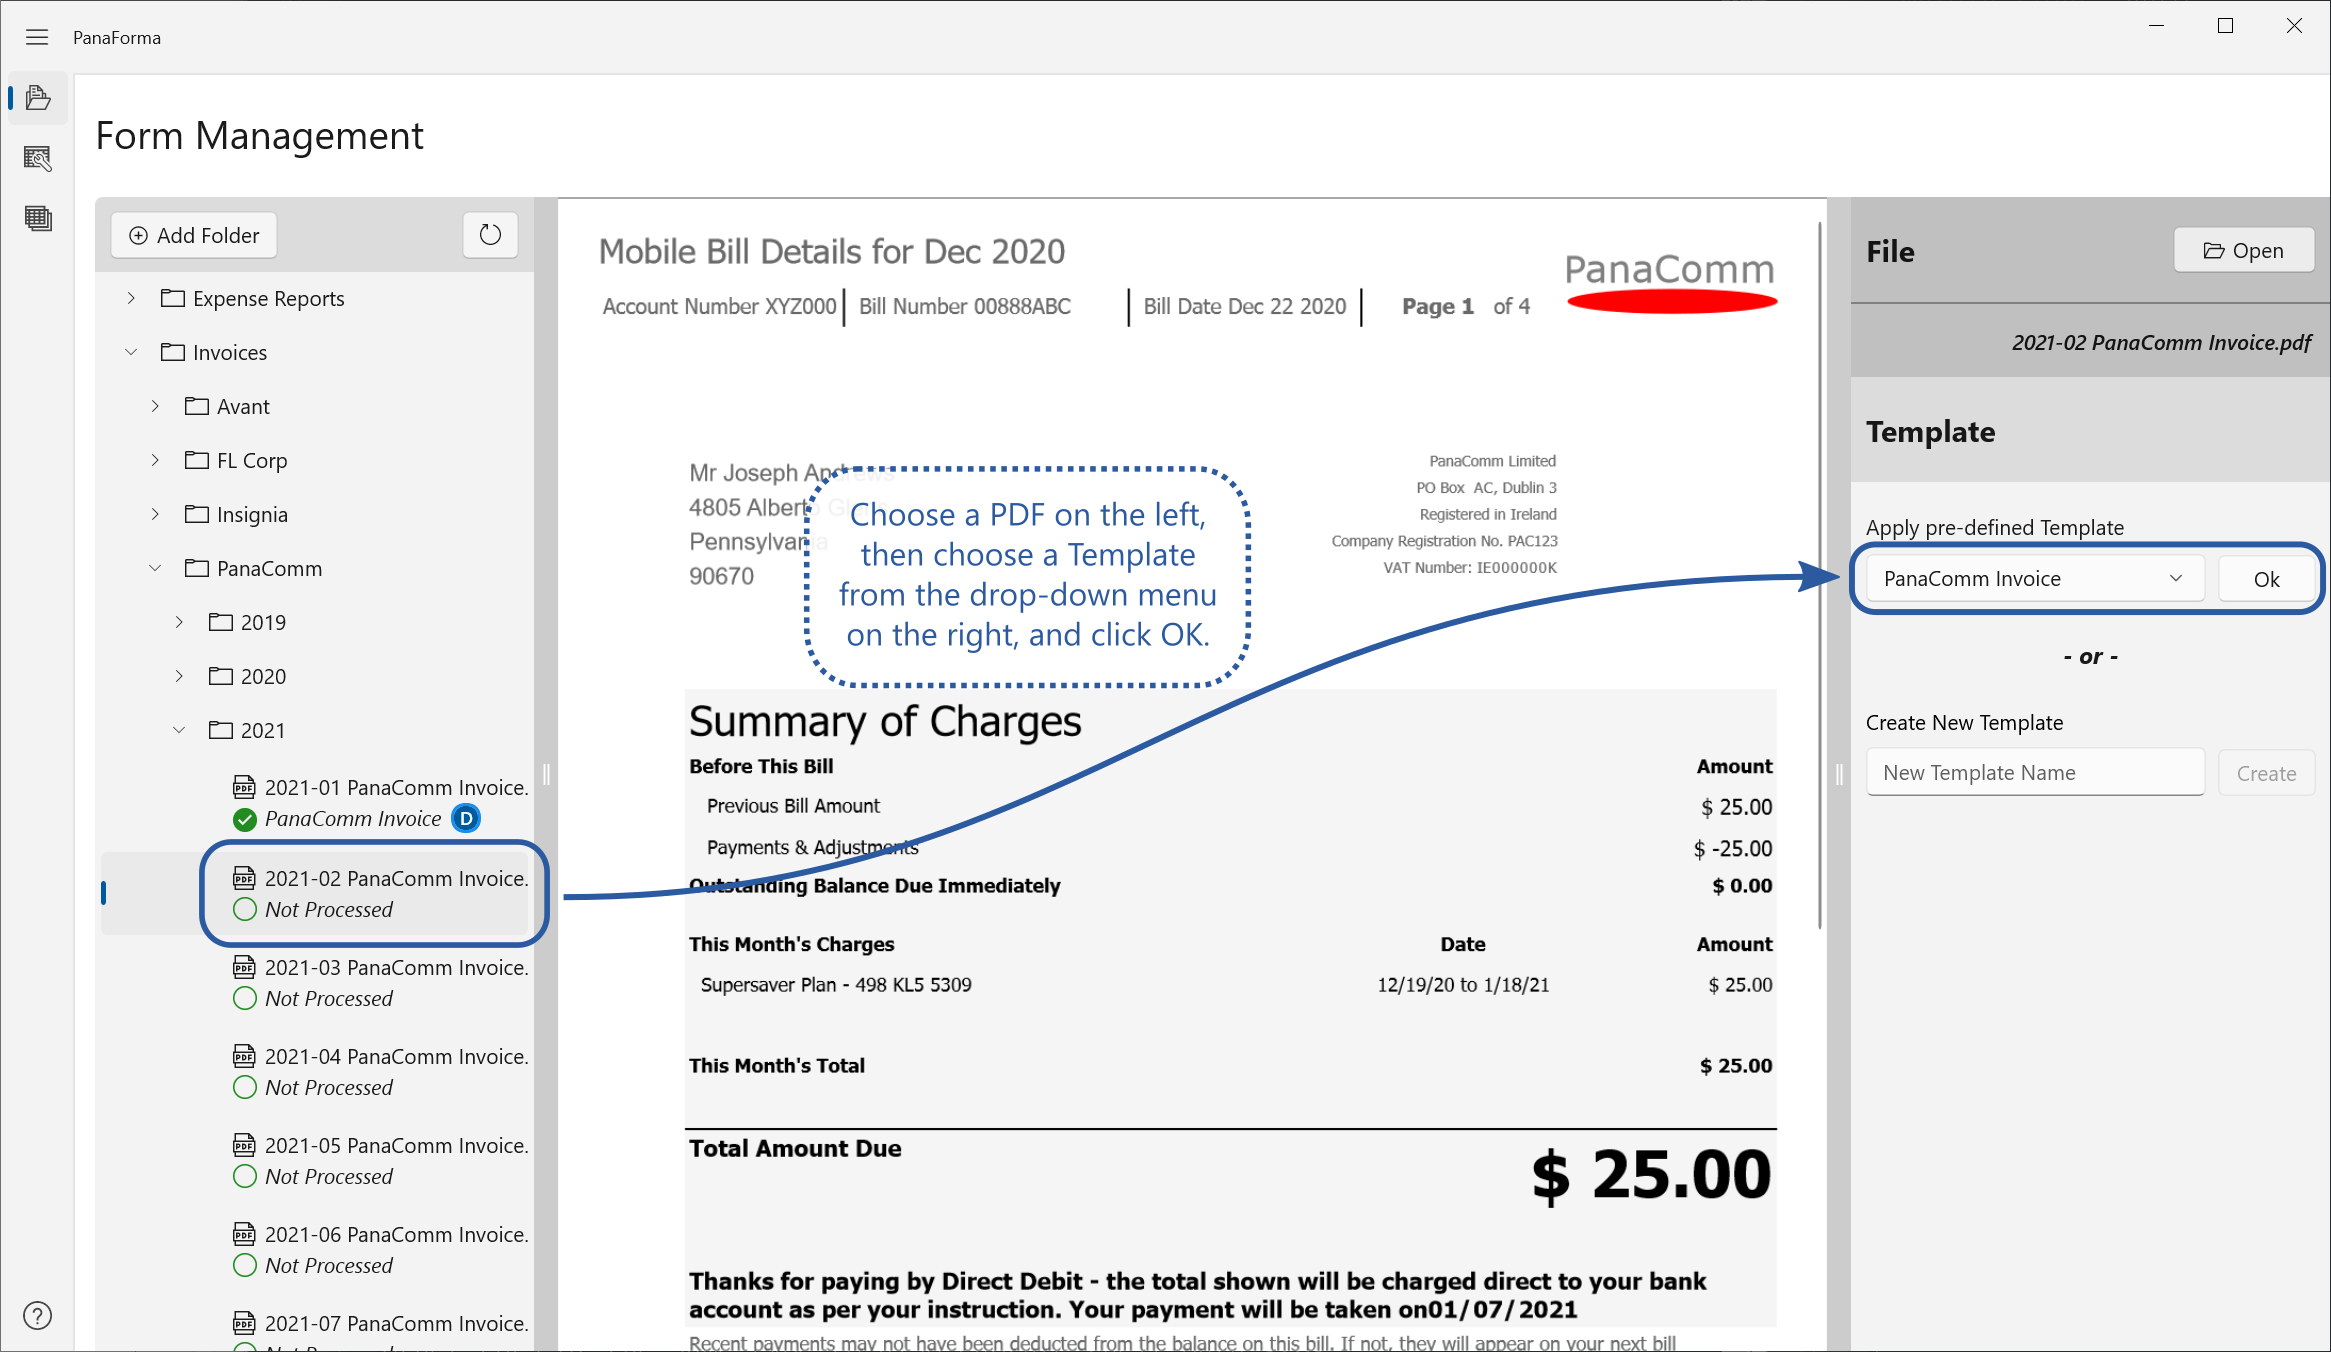
Once the Template is applied, the pre-defined field selections will appear, and the values from inside their areas will be captured from the PDF. You may adjust the size and position of any field selection, and also make manual edits to captured values, if necessary.
Any adjustment you make to the field selections will be confined to this form — the Default Template definition will be unaffected. Note that the field names can only be edited on the Default Template form.
The Template can be applied to as many single PDFs as required. In this example, the user created a Default Template using the January Invoice, and then applied that Template to Invoices for February, March, April, etc… Data will therefore be captured for all of these months. Alternatively, use the Bulk Processing feature to apply a Template to all PDFs in a folder, as described in the next section.
To apply a Template to all unprocessed PDFs in a folder (and sub-folders, if required), select the required folder from the folder tree on the left. Bulk Processing options similar to the ones shown in the screenshot below will appear.
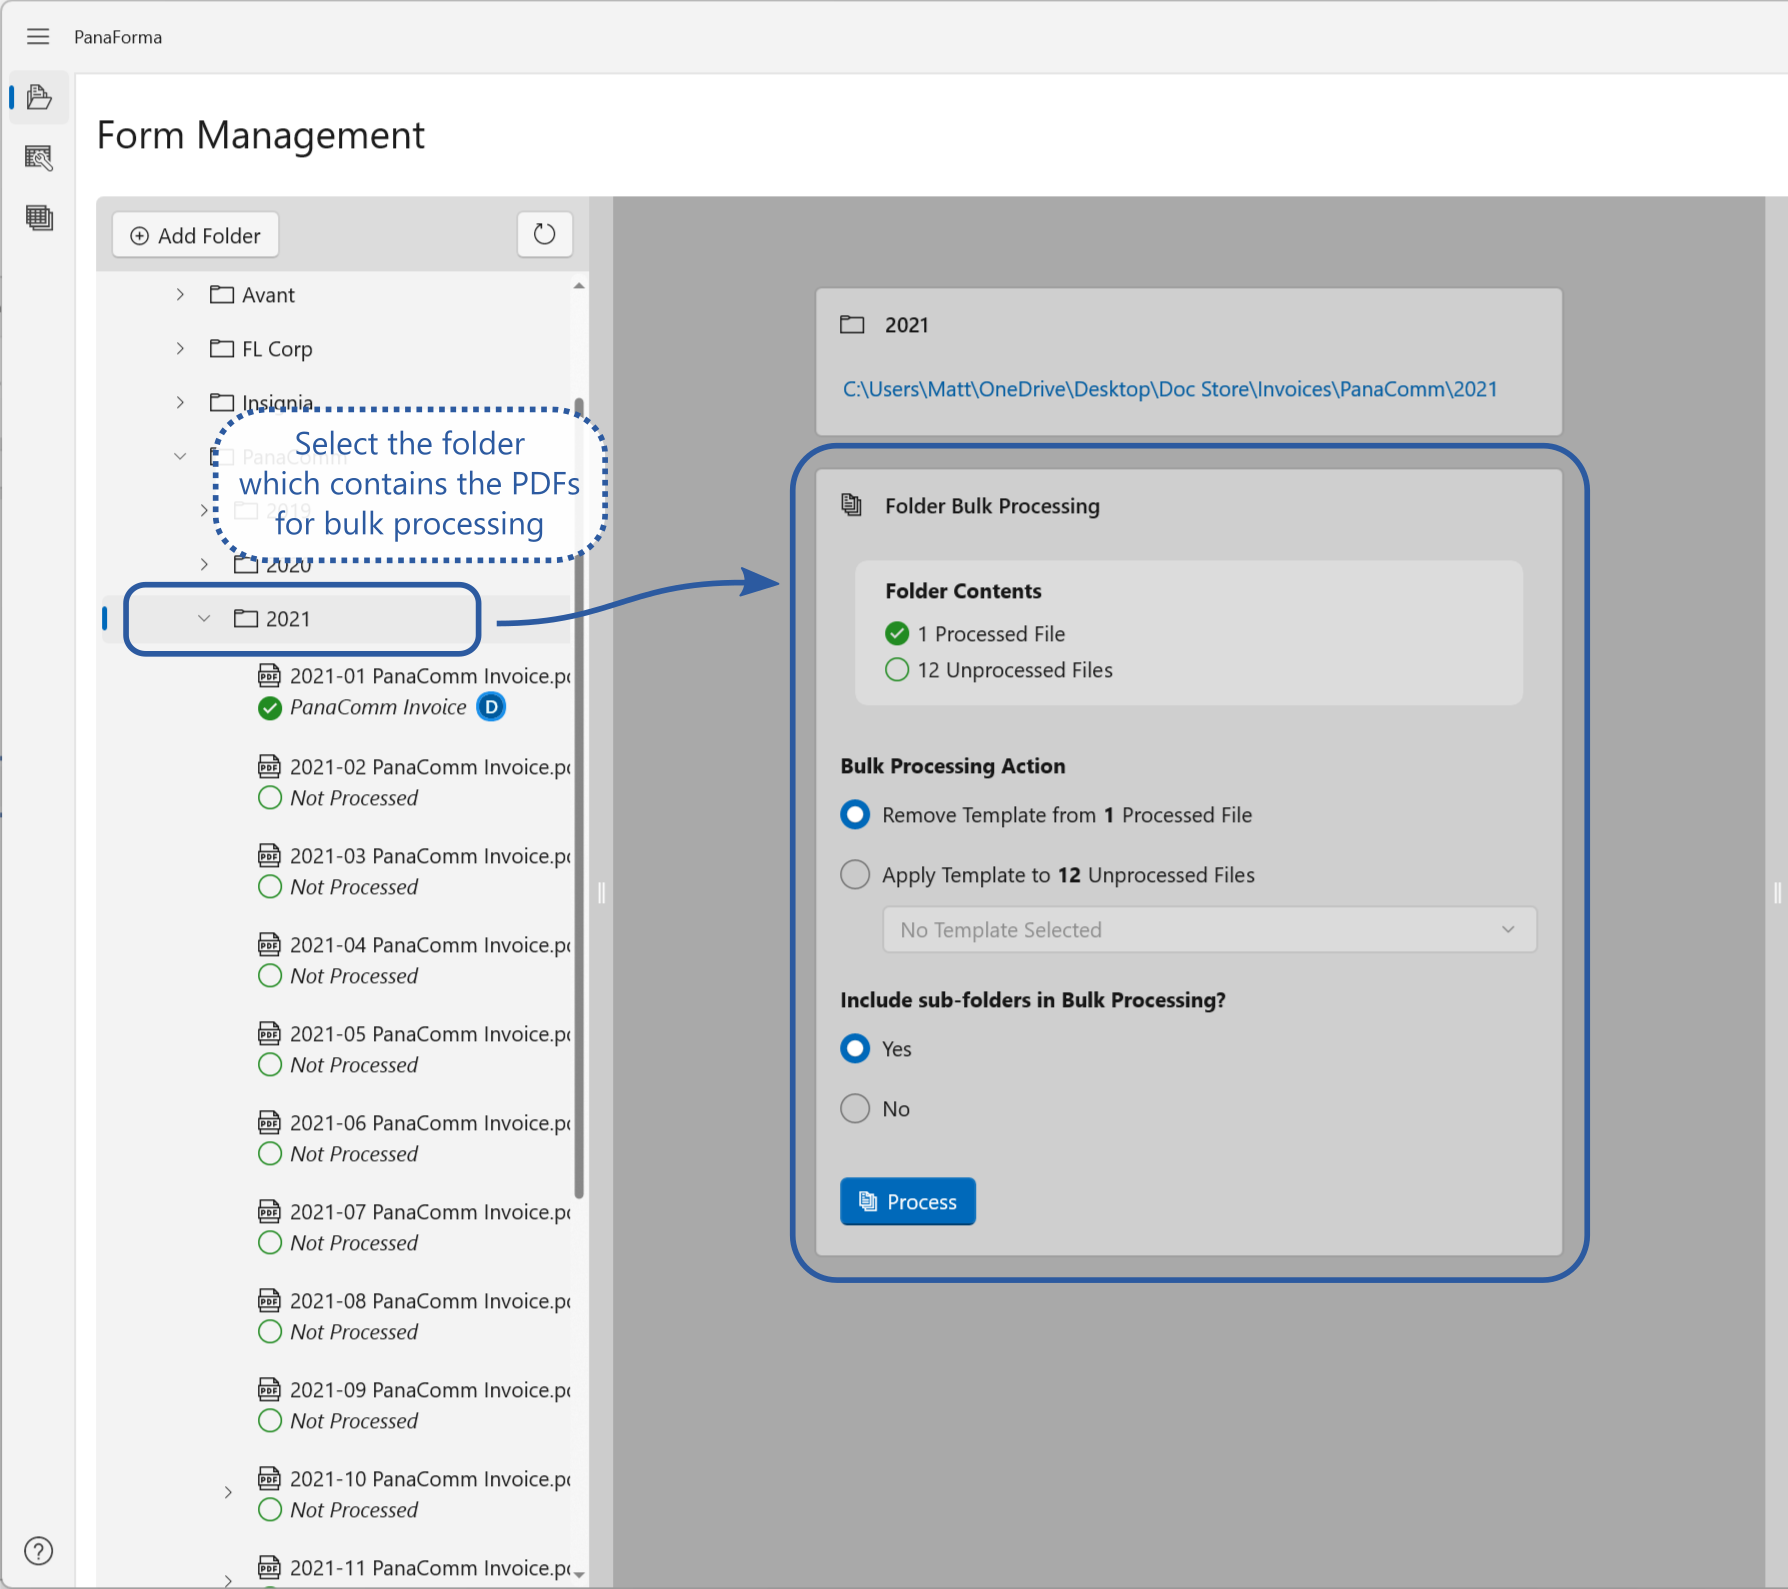
Choose the "Apply Template..." option and the required Template from the drop-down menu, then choose whether you want to include sub-folders in the Bulk Processing action. The dialog will show the number of Processed and Unprocessed files detected in the folder, so verify that this is correct before proceeding. Finally, click the "Process" button to start the application of the Template to the PDFs in the folder.
After processing is complete, it is a good idea to use the "Data Extracts" screen to verify that the required data was extracted from the PDFs. For example, variations in PDF page layouts might cause some data fields to not be correctly extracted. The "Data Extracts" screen is described in the next section.
Once you've applied a Template to a number of PDF forms, you'll want to review the captured data, edit it if necessary, and export it for further use. To do this, switch to the “Data Extracts” screen using the left navigation bar button.
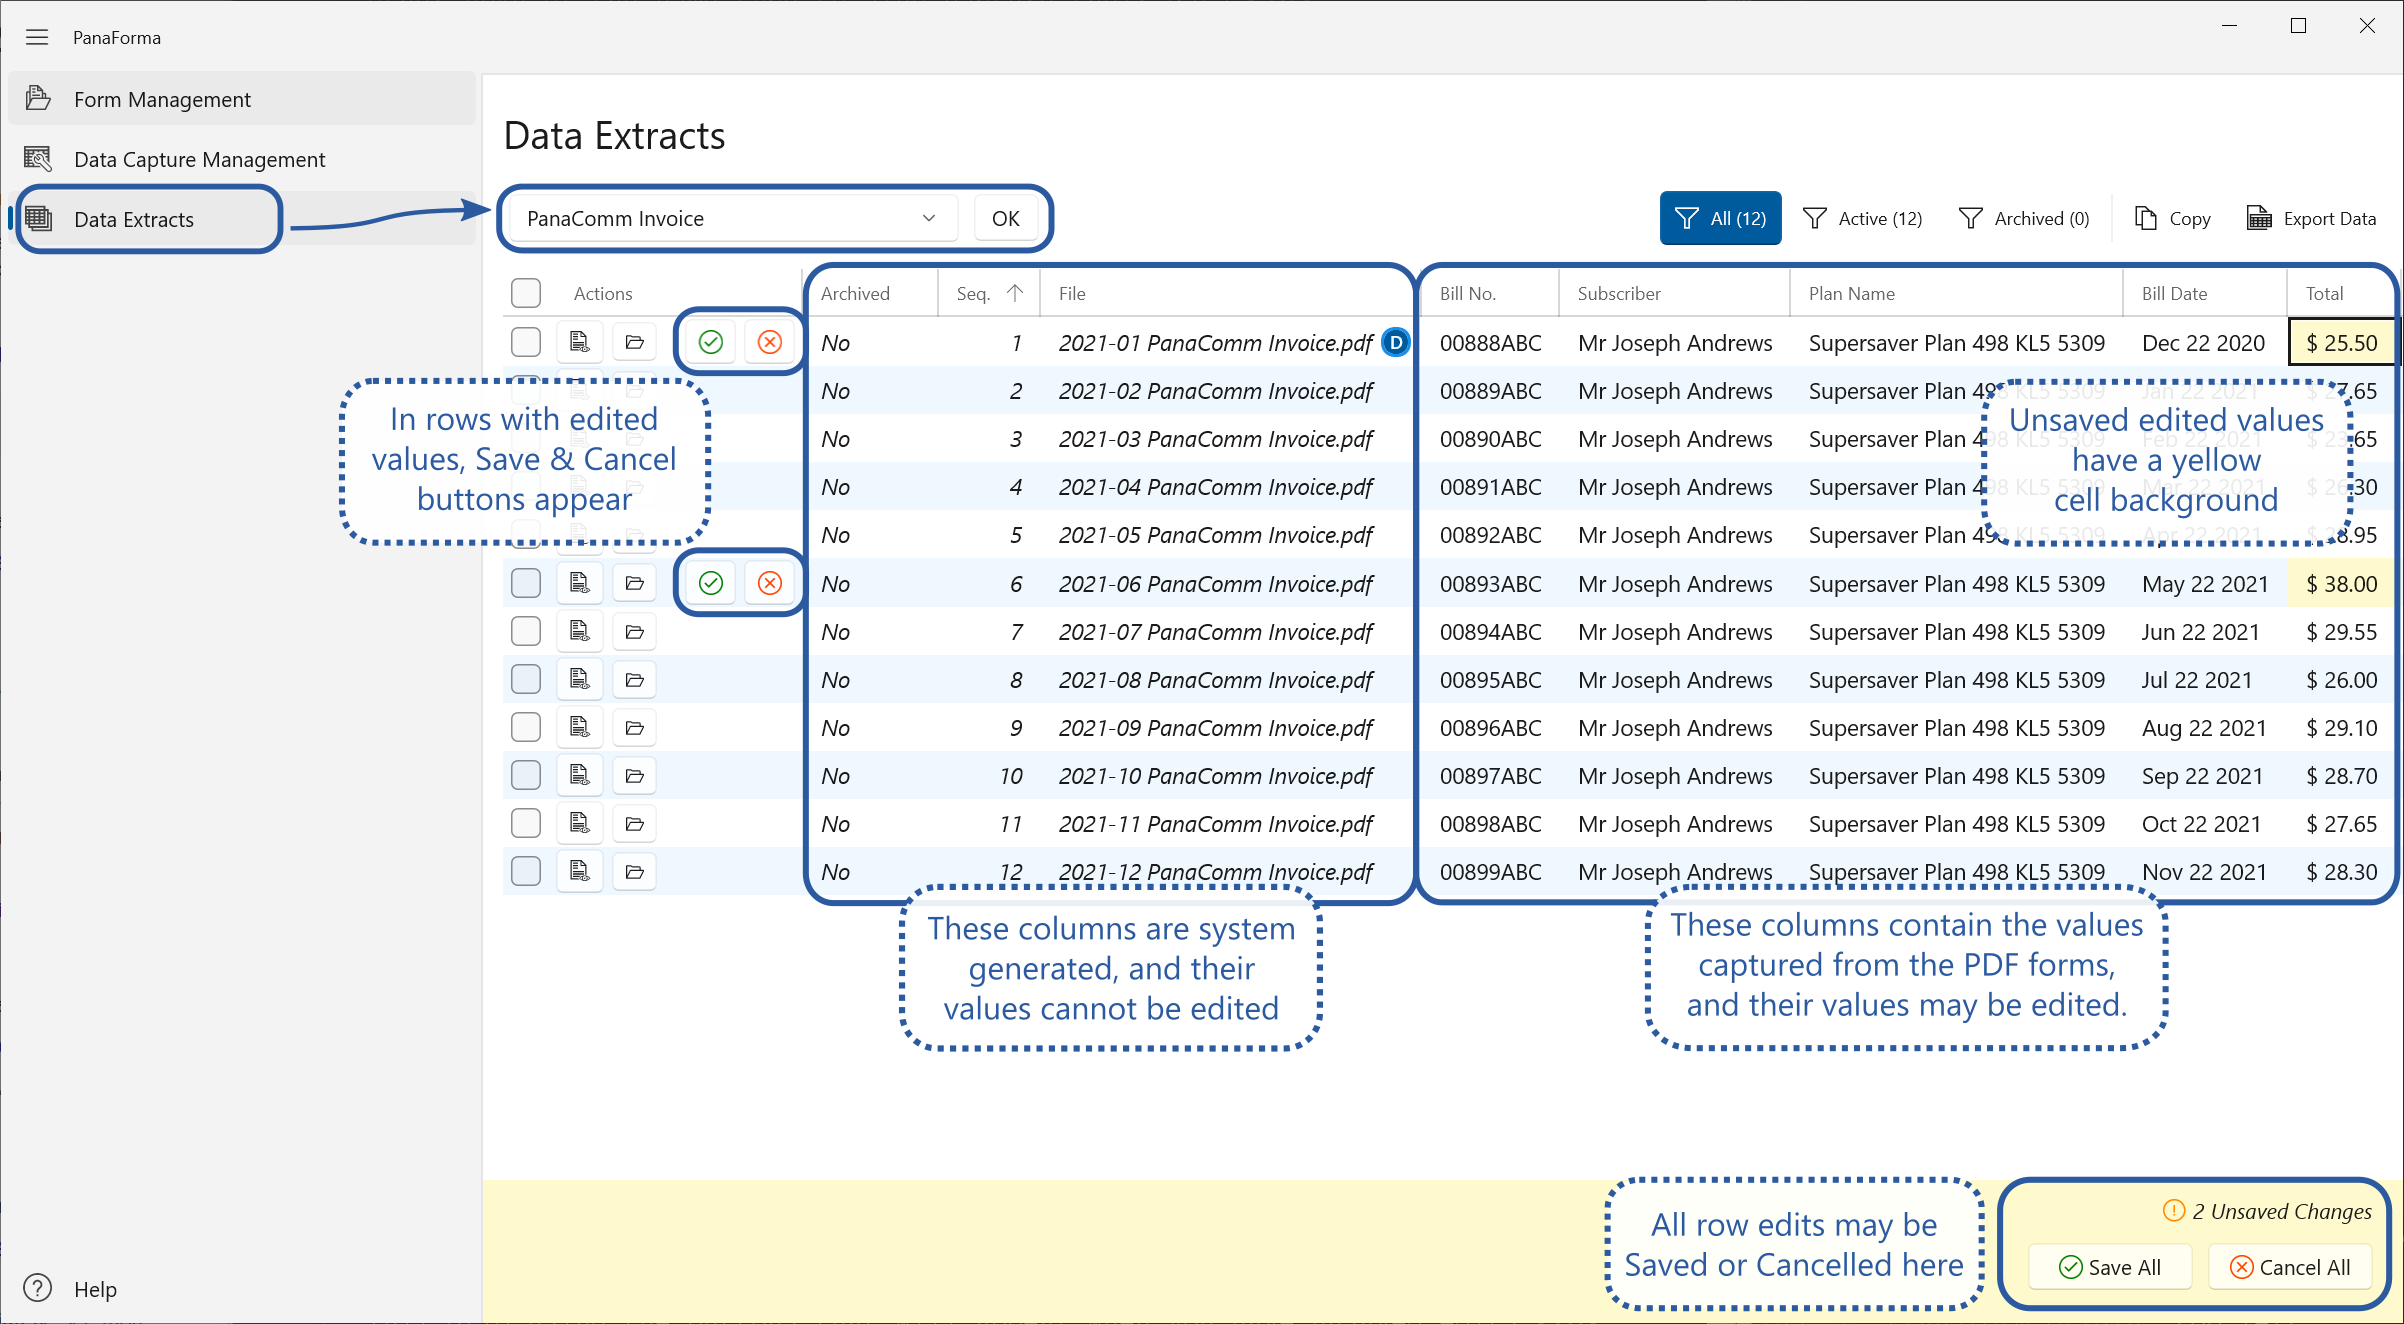
On the Data Extracts screen, pick the Template you created from the drop-down menu, and click OK to load the Template's data into the grid.
On the data grid you can edit any captured value by double clicking on its cell to enter edit mode, or by selecting the cell and pressing the F2 key. You can move the cell selection around the grid using the arrow keys on your keyboard. Edited cells are not saved immediately. They will appear with a yellow background until saved. You can save or cancel your changes on a single row, or across the full grid using the buttons that will appear when you have unsaved edits.
To export data from PanaForma you can either copy rows to the clipboard and paste them into another application, or you can export row data to an Excel or CSV file.
Note: To copy data to the clipboard or export it to a file, a PanaForma subscription is required.
PanaForma offers a one-month free trial subscription to new users. If you decide to cancel the subscription during the free trial period, you will not be charged.
A subscription is charged month-to-month with no long-term commitment required, or you can choose to pay anually to receive a discount. You may cancel your subscription before any renewal.
When copying rows to the clipboard, you may copy all the rows for a Template, or a limited selection. For a limited selection, use the checkboxes in the leftmost column to select the rows you want to copy. To copy the rows to the clipboard, click the "Copy" button in the upper-right corner of the Data Extracts screen.
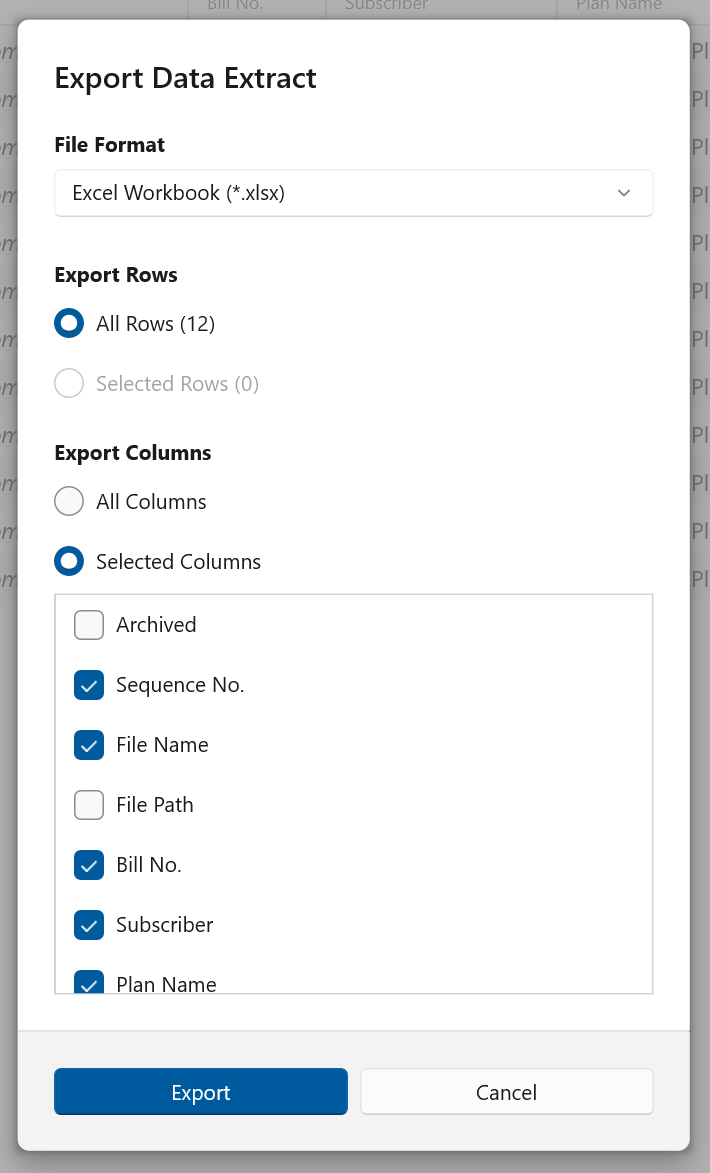
To export data to a file, click the "Export Data" button in the upper-right corner of the Data Extracts screen. An export options dialog will appear. Here you can choose the export file format, whether all or only selected rows are exported, and whether all or only selected columns are exported.
Click the Export button on the dialog to choose the name and location where the file should be saved.
This concludes the Quickstart Guide. We hope that's enough to get you started, but if you need more detailed info now or any time in the future, there's lots more available in the other Help pages.