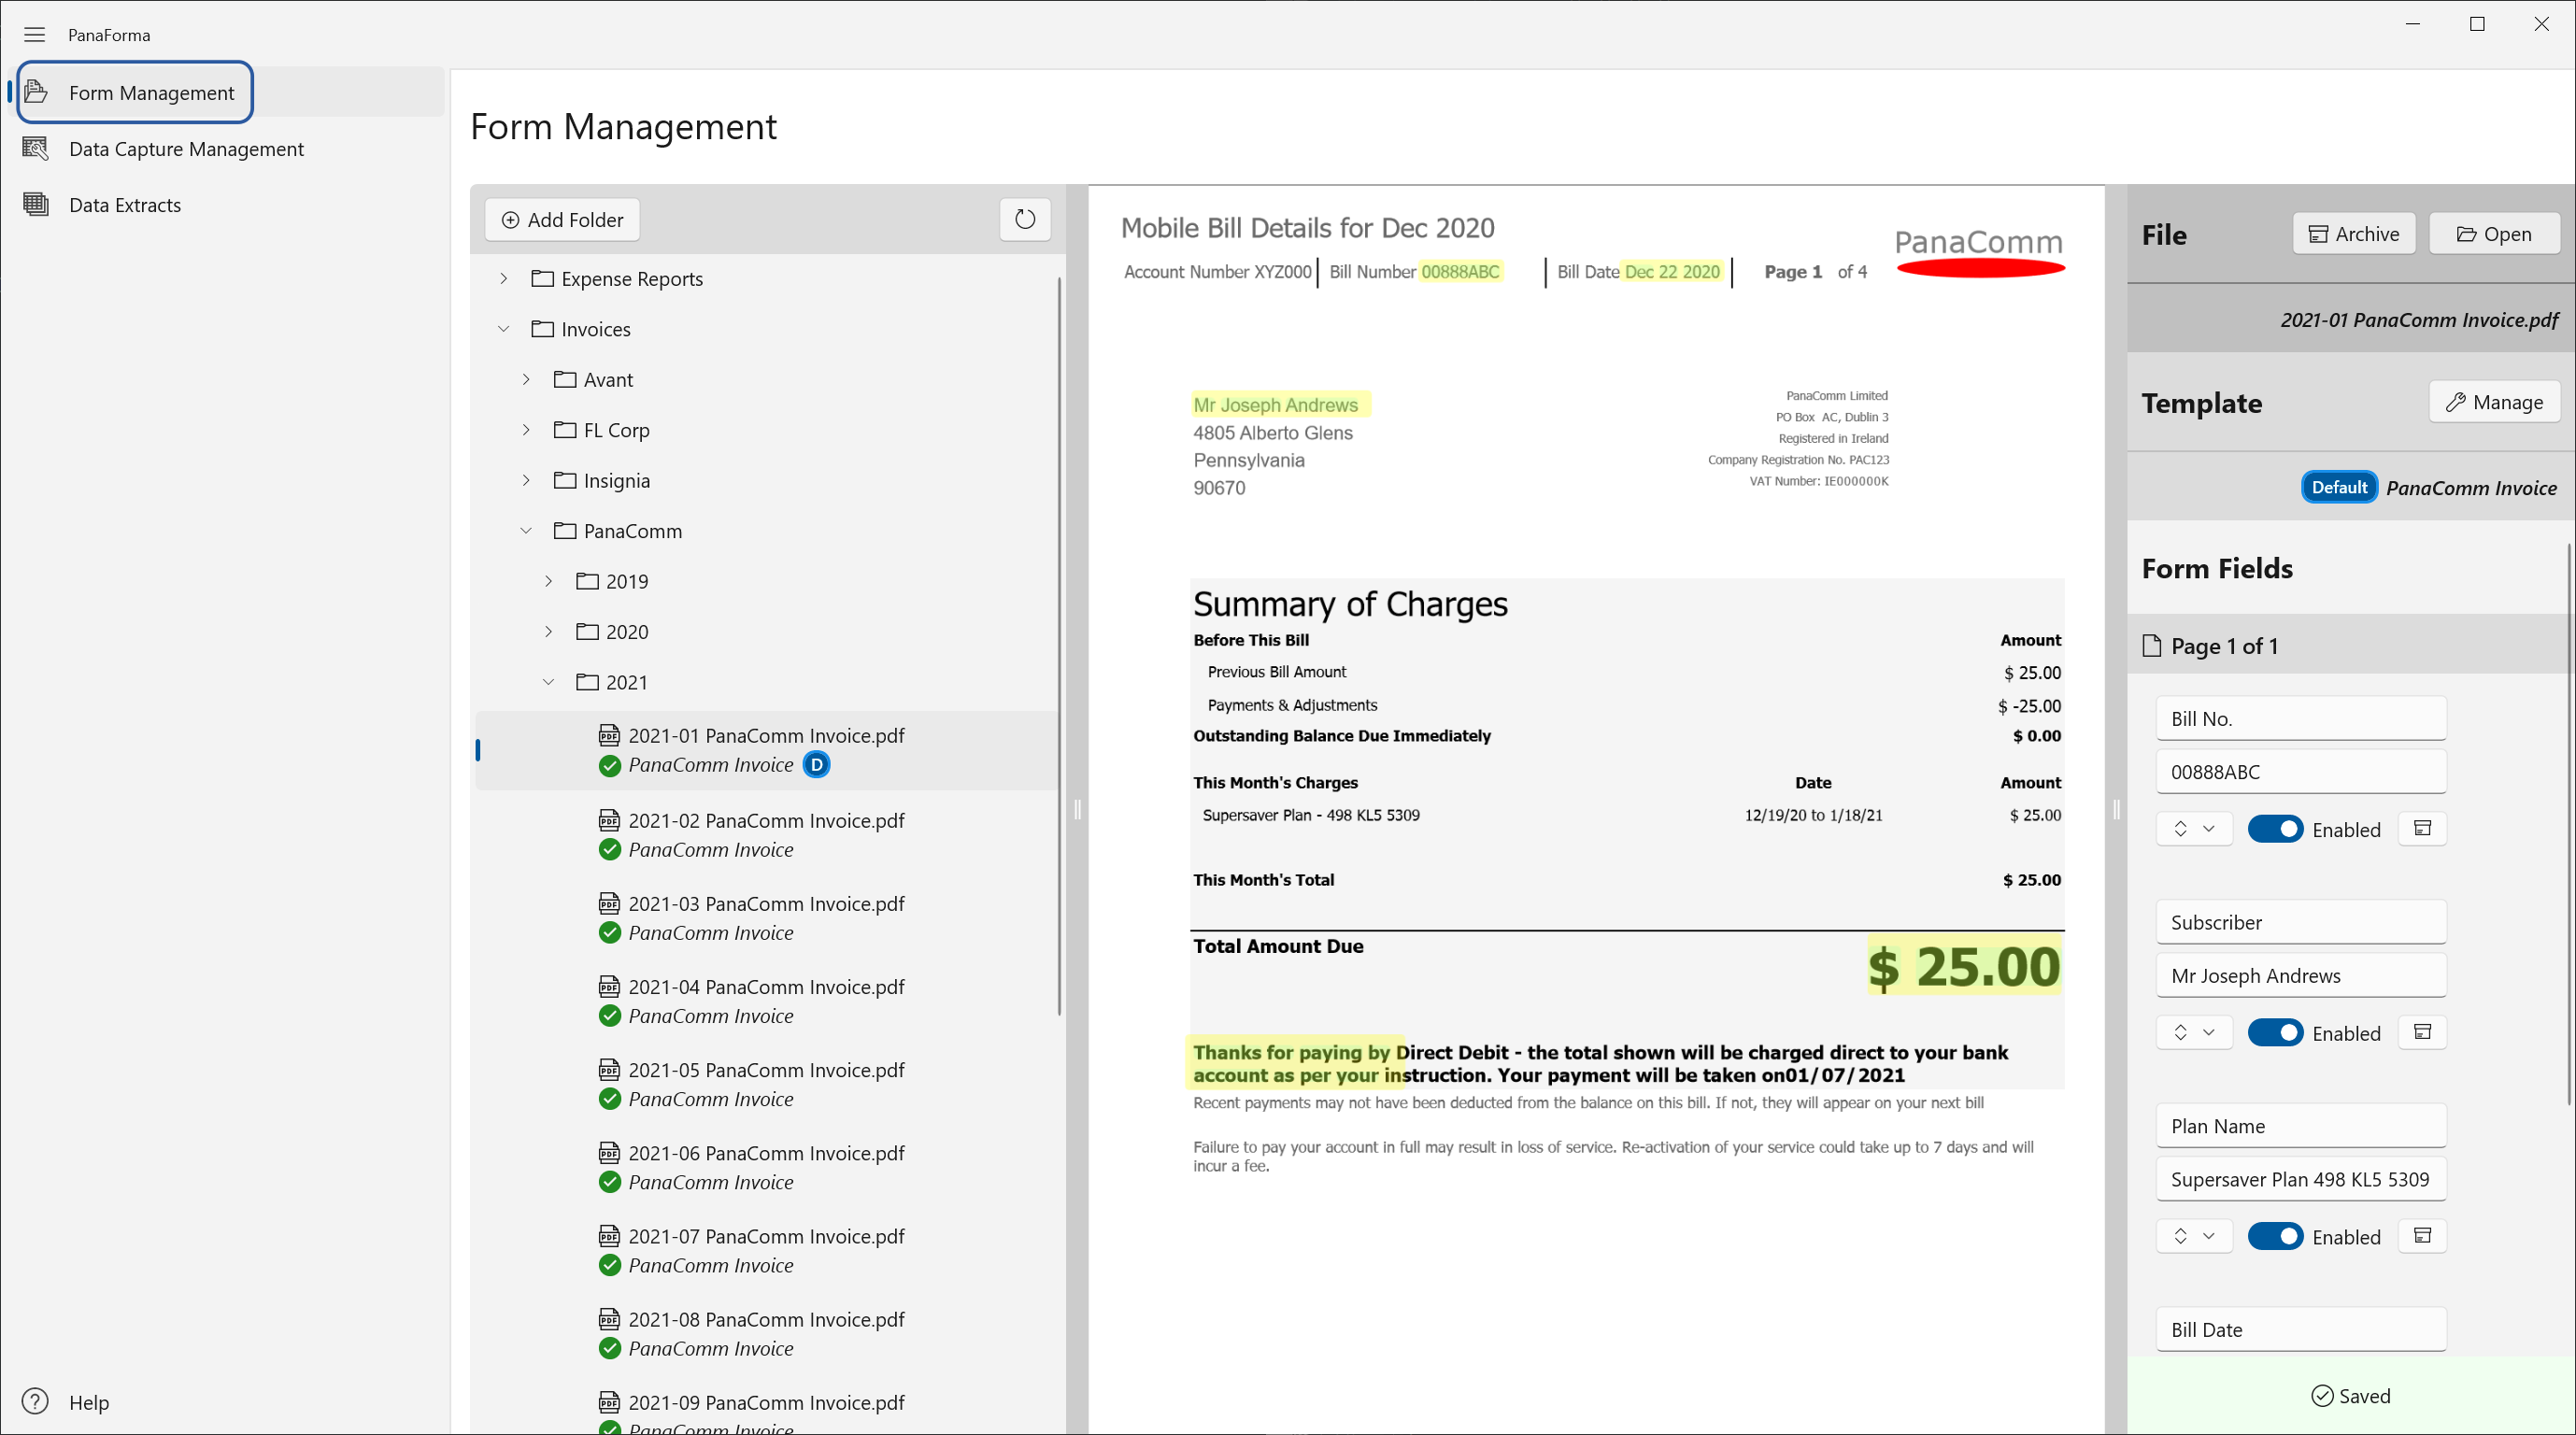
The Form Management screen is where you:
To open PDF form files, you must first add their folders to PanaForma. When a folder is added, PanaForma will have access to all the PDFs in that folder and all of its sub-folders.
Note: When organizing your PDF files, it's better to divide them among a number of folders instead of keeping them all in a single folder.
For example, if you are managing invoices, you might distribute the PDFs into supplier folders, and/or year folders.
Organizing your files in this way will make them easier for you to find, and also improve the performance of PanaForma, which can be impaired when there are many hundreds or more files in a single folder.
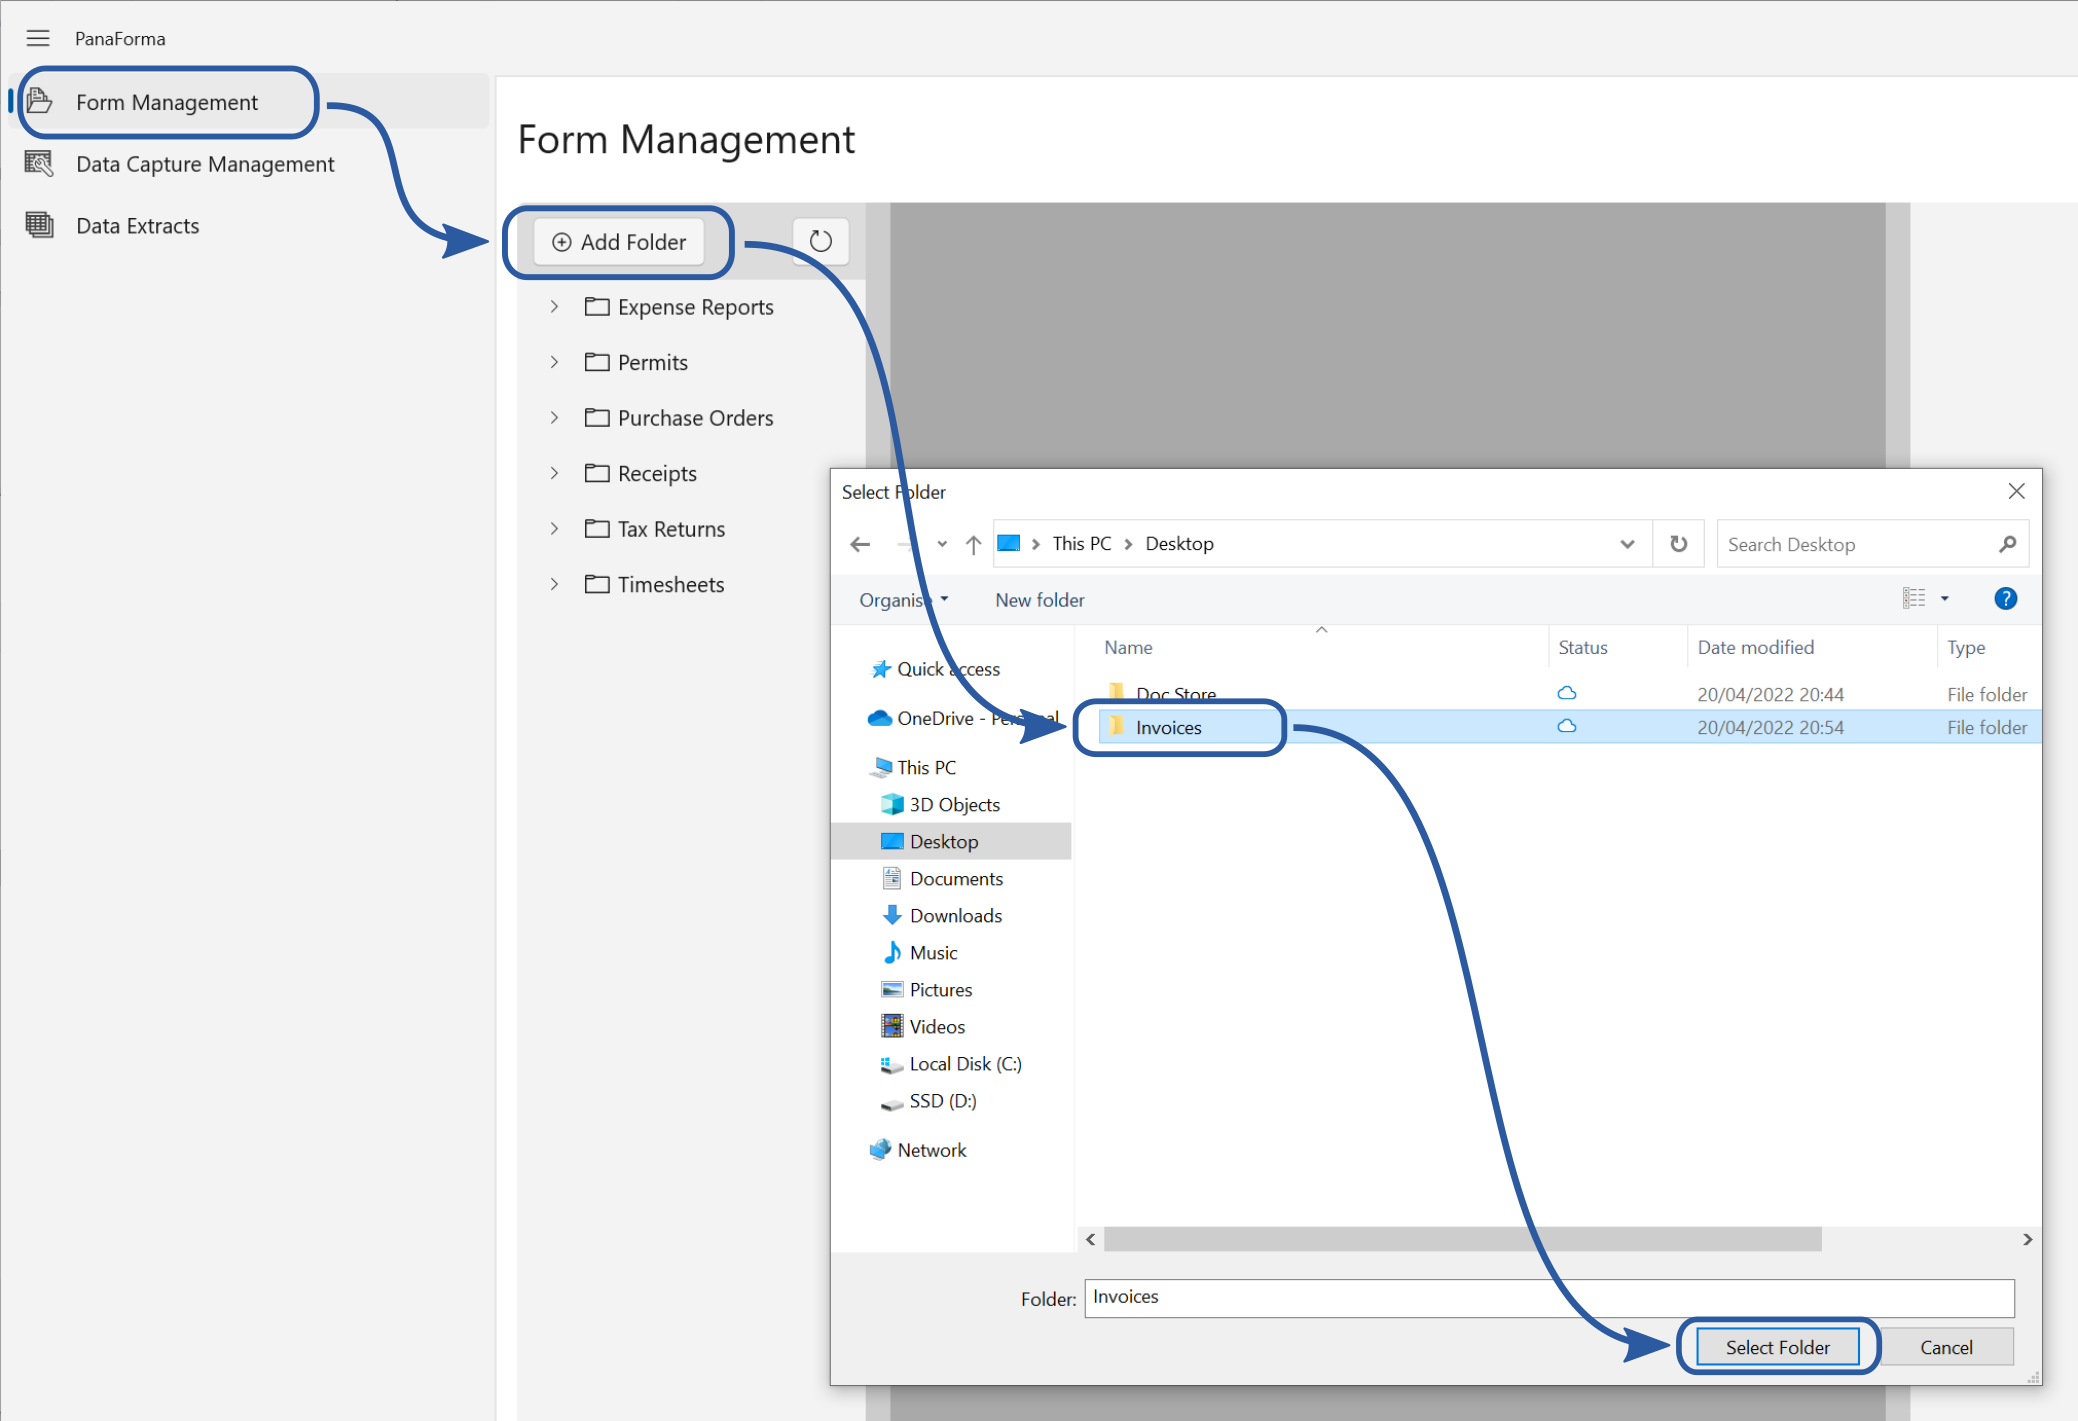
To add a folder, click the "Add Folder" button in the top left of the Form Management page. Choose the required folder in the dialog, and click select.
Once you've added a folder, you can expand it to see the files and sub-folders it contains. To do that, click the chevron shaped arrow on the left side of the folder icon.
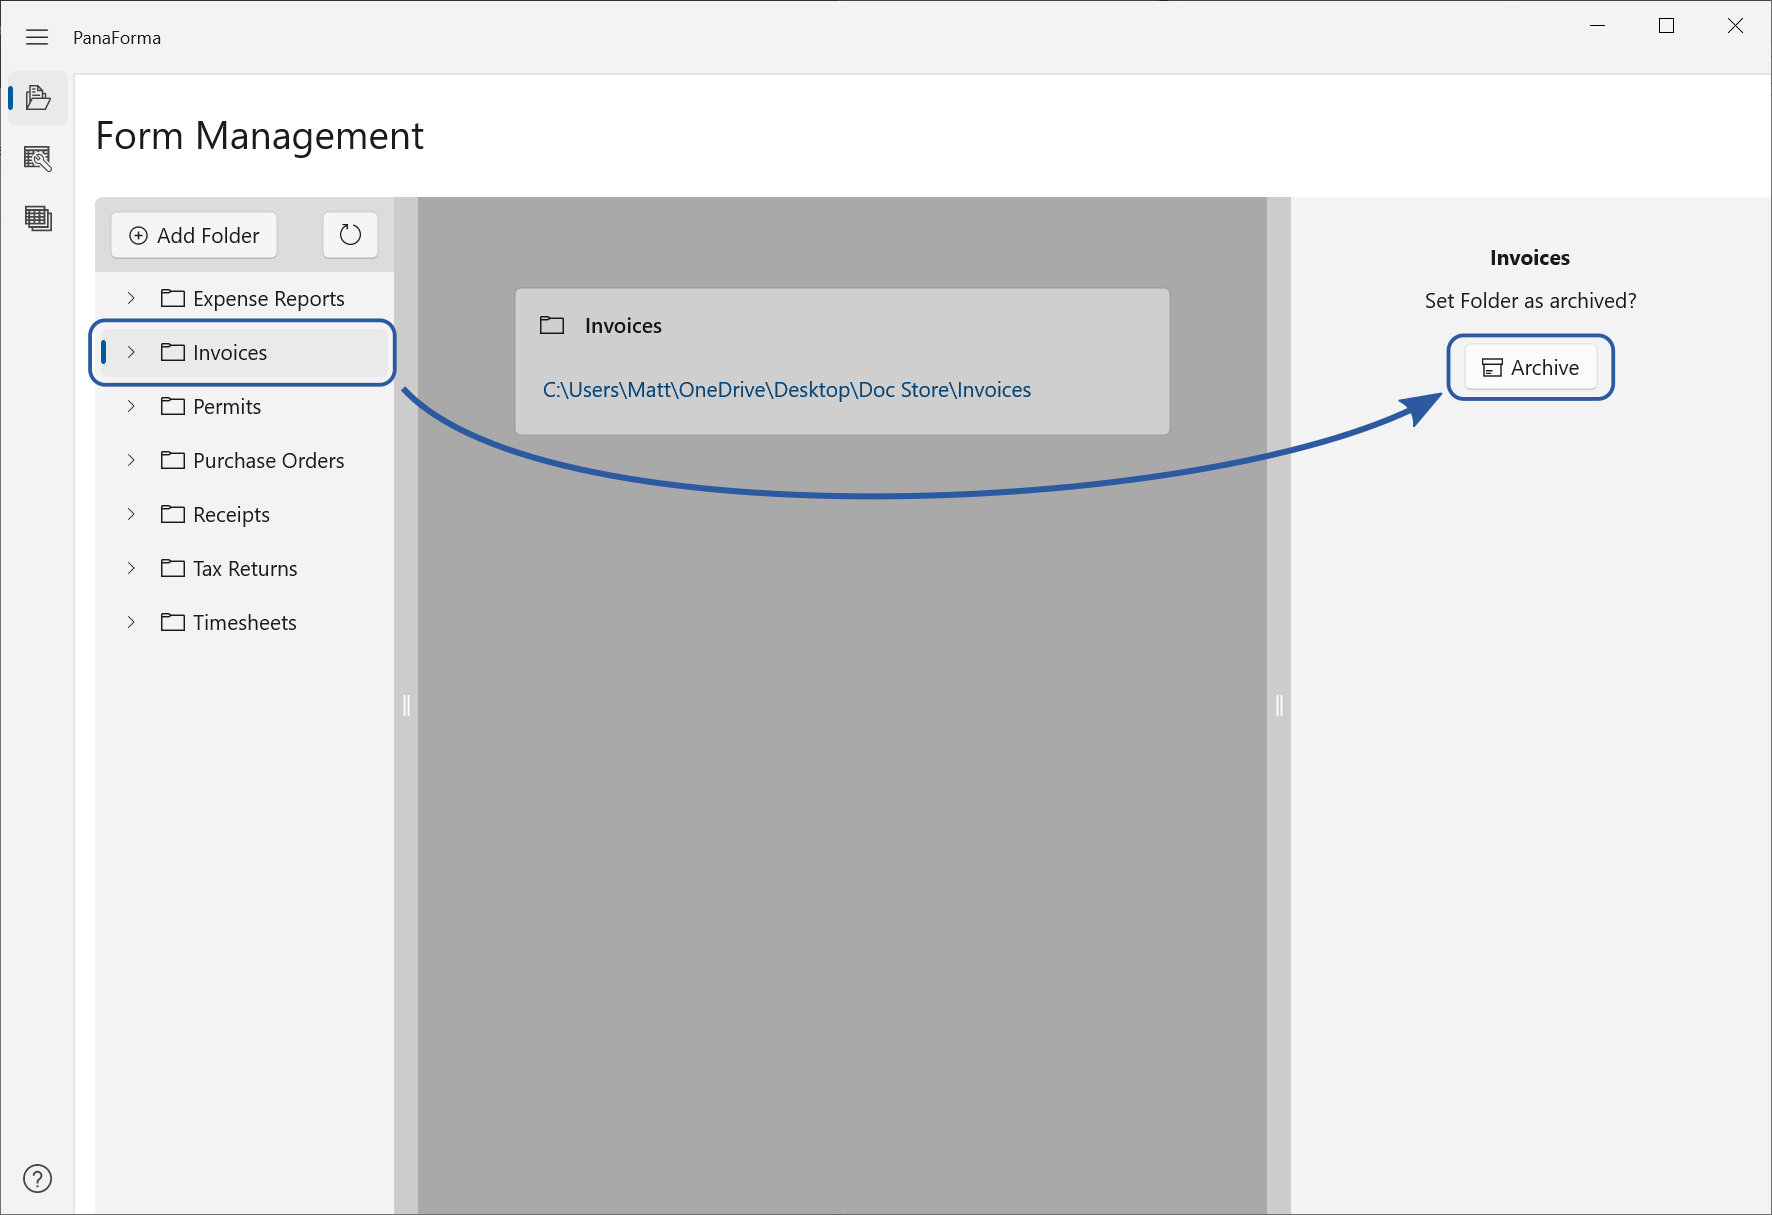
If you no longer want to see a top-level folder in the file/folder panel, you can mark the folder as archived. To do this, click the folder name in the panel, and you will see an "Archive" button in the right side panel of the screen.
Notes on Folder Archiving:
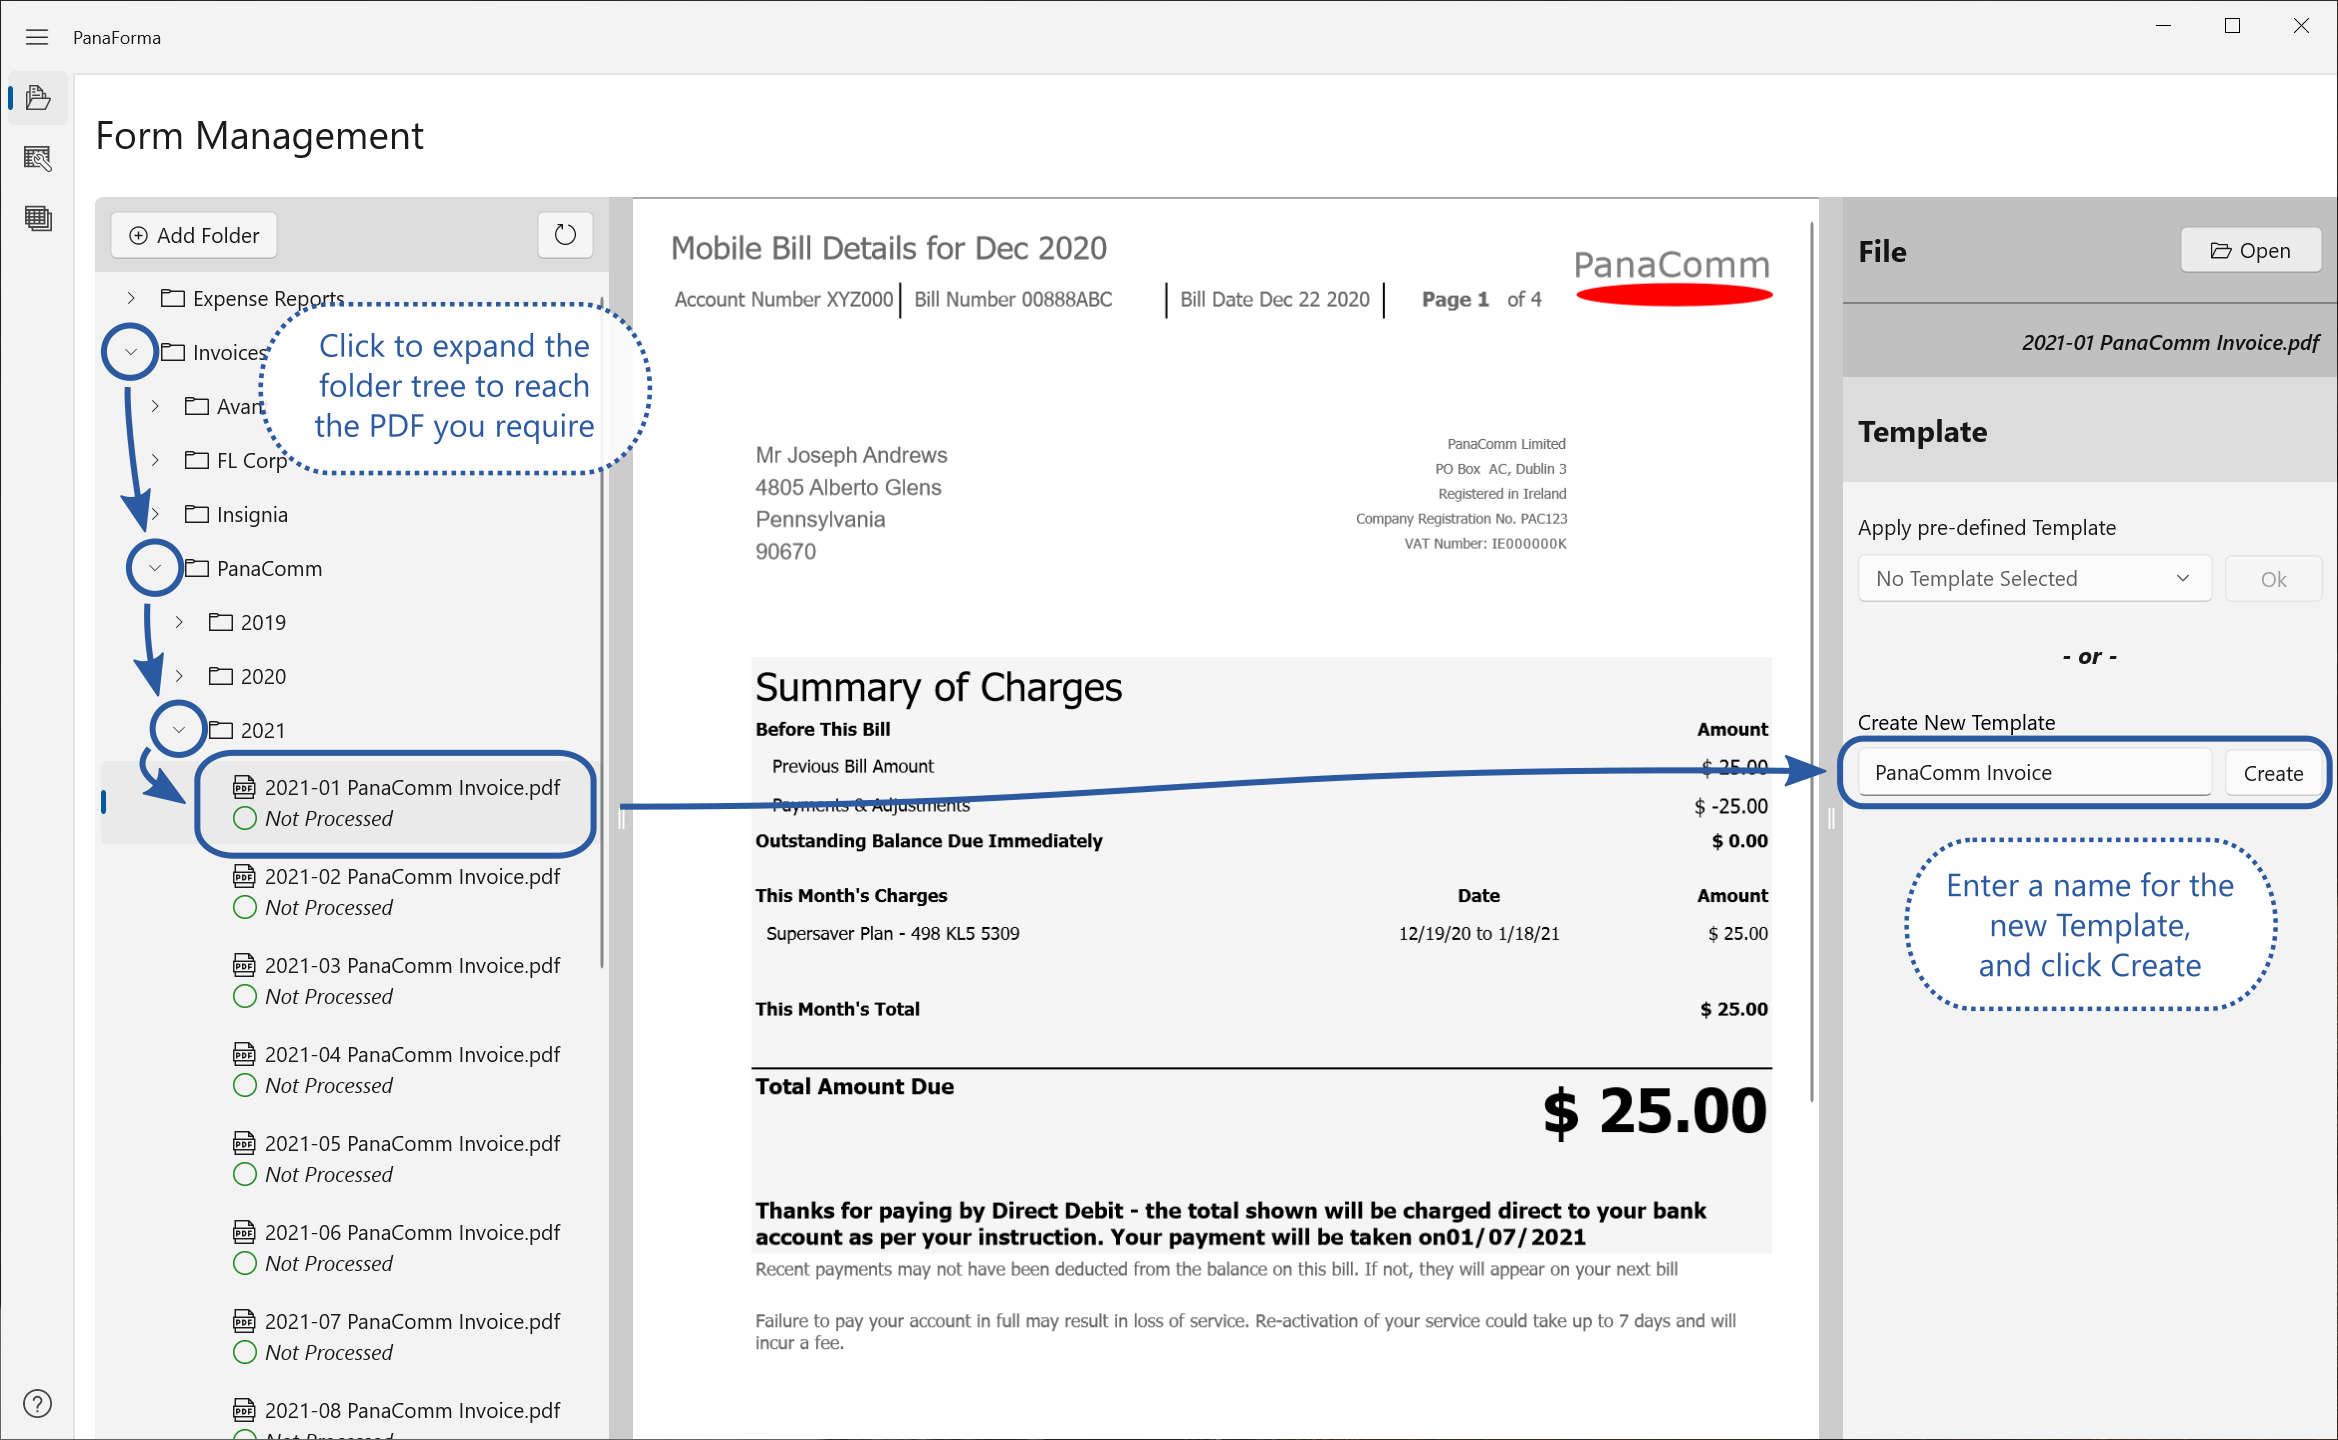
To create a new Template for a type of form from which haven't captured data before, first find the PDF form file in the folder list on the left. Any PDF without a Template applied will have the status “Unprocessed”. Click the PDF to open and view it.
Note: PanaForma works best when forms using the same Template have a consistent layout. The PDF form file you choose to create a new Template becomes the Default Form for that Template. As such, it's best that it is a very typical example of the form type.
Also note that the Default Form for a Template cannot be deleted unless the Template itself is deleted, or a different PDF form file is set as the Default Template.
Next, in the right side panel, type a name for the Template in the "Create New Template" text-box, and click OK. The name you choose must be unique.
Now add fields to the Template by drawing selection boxes around the required values on the PDF's pages. To draw a selection box, move the mouse pointer over the PDF page, hold down the left mouse button and drag to create a selection. Release the mouse button when large enough. A selection box may be resized using the white handles at its corners, or it may be moved to a new location by dragging.
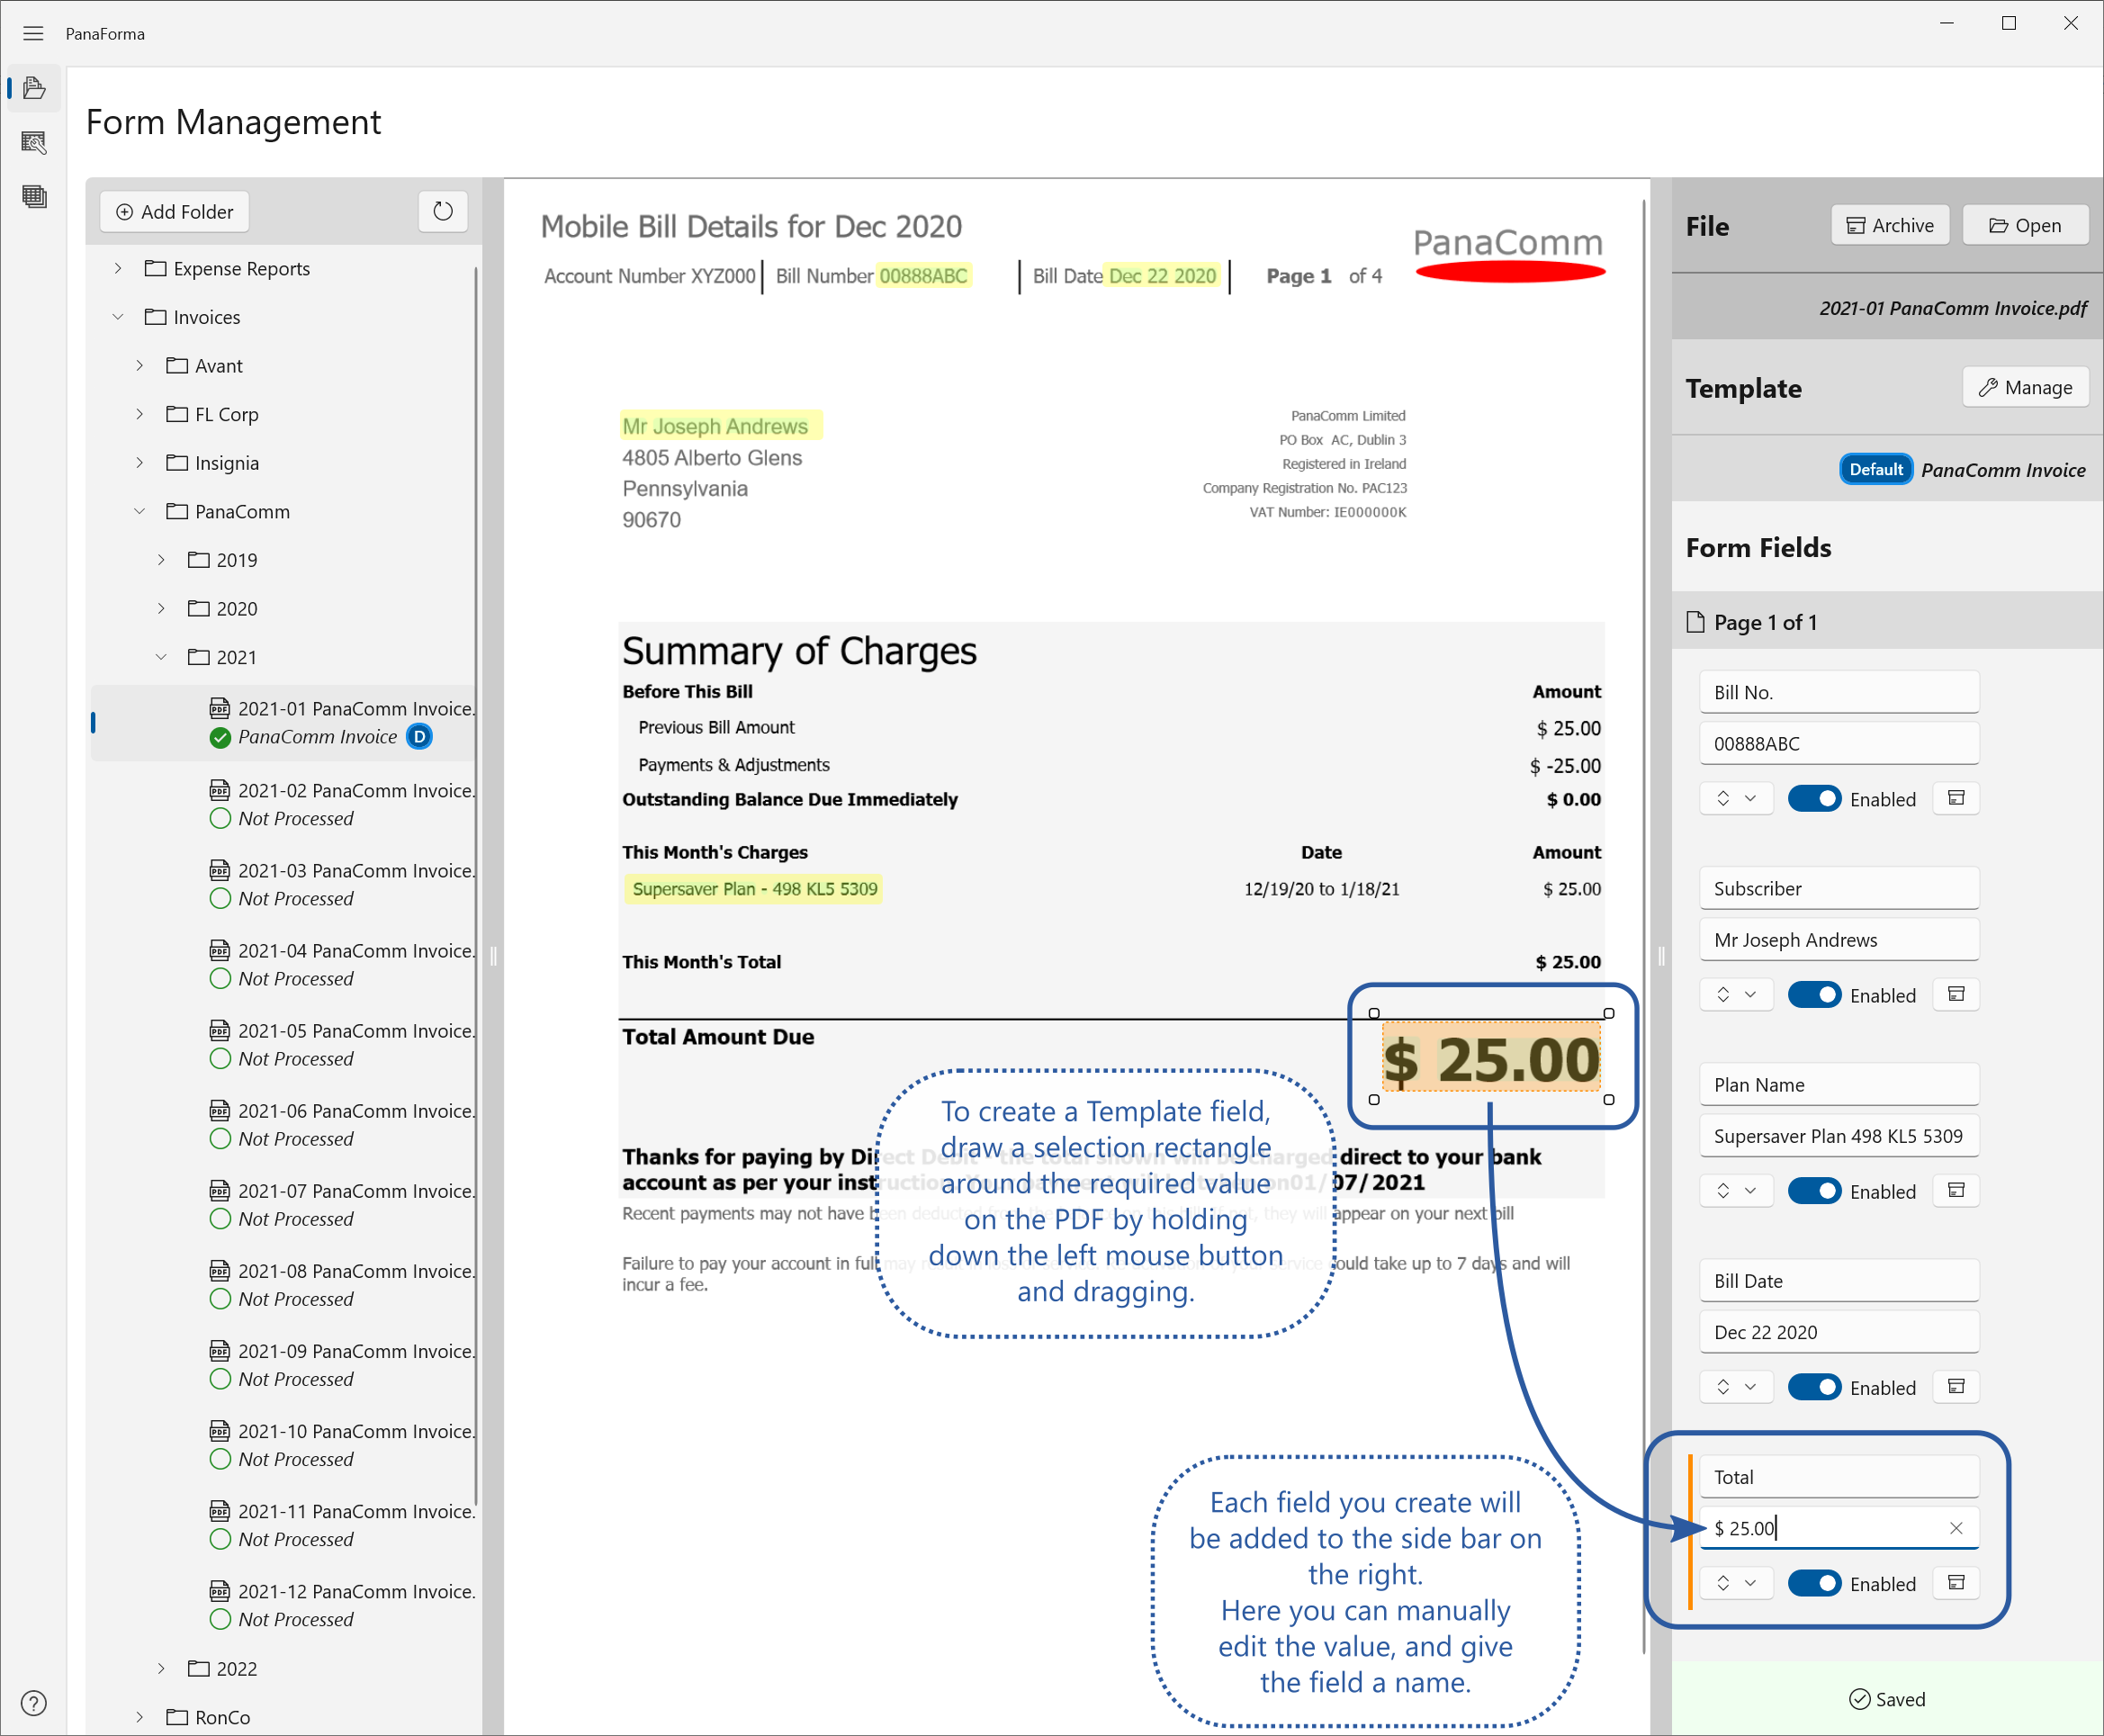
Each time you create a selection, a new Field will appear in the right side panel. Here you may give the Field a meaningful name, and make any adjustments necessary to the captured value
You may apply an existing Template to a PDF form file to capture the data from that file. Find the required PDF in the folder list on the left side of the screen. Any PDF without a Template applied will be listed as “Unprocessed”. Click the PDF to open and view it.
Next, in the right side panel, choose the appropriate Template from the "Apply existing Template" drop-down menu, and click the OK button.
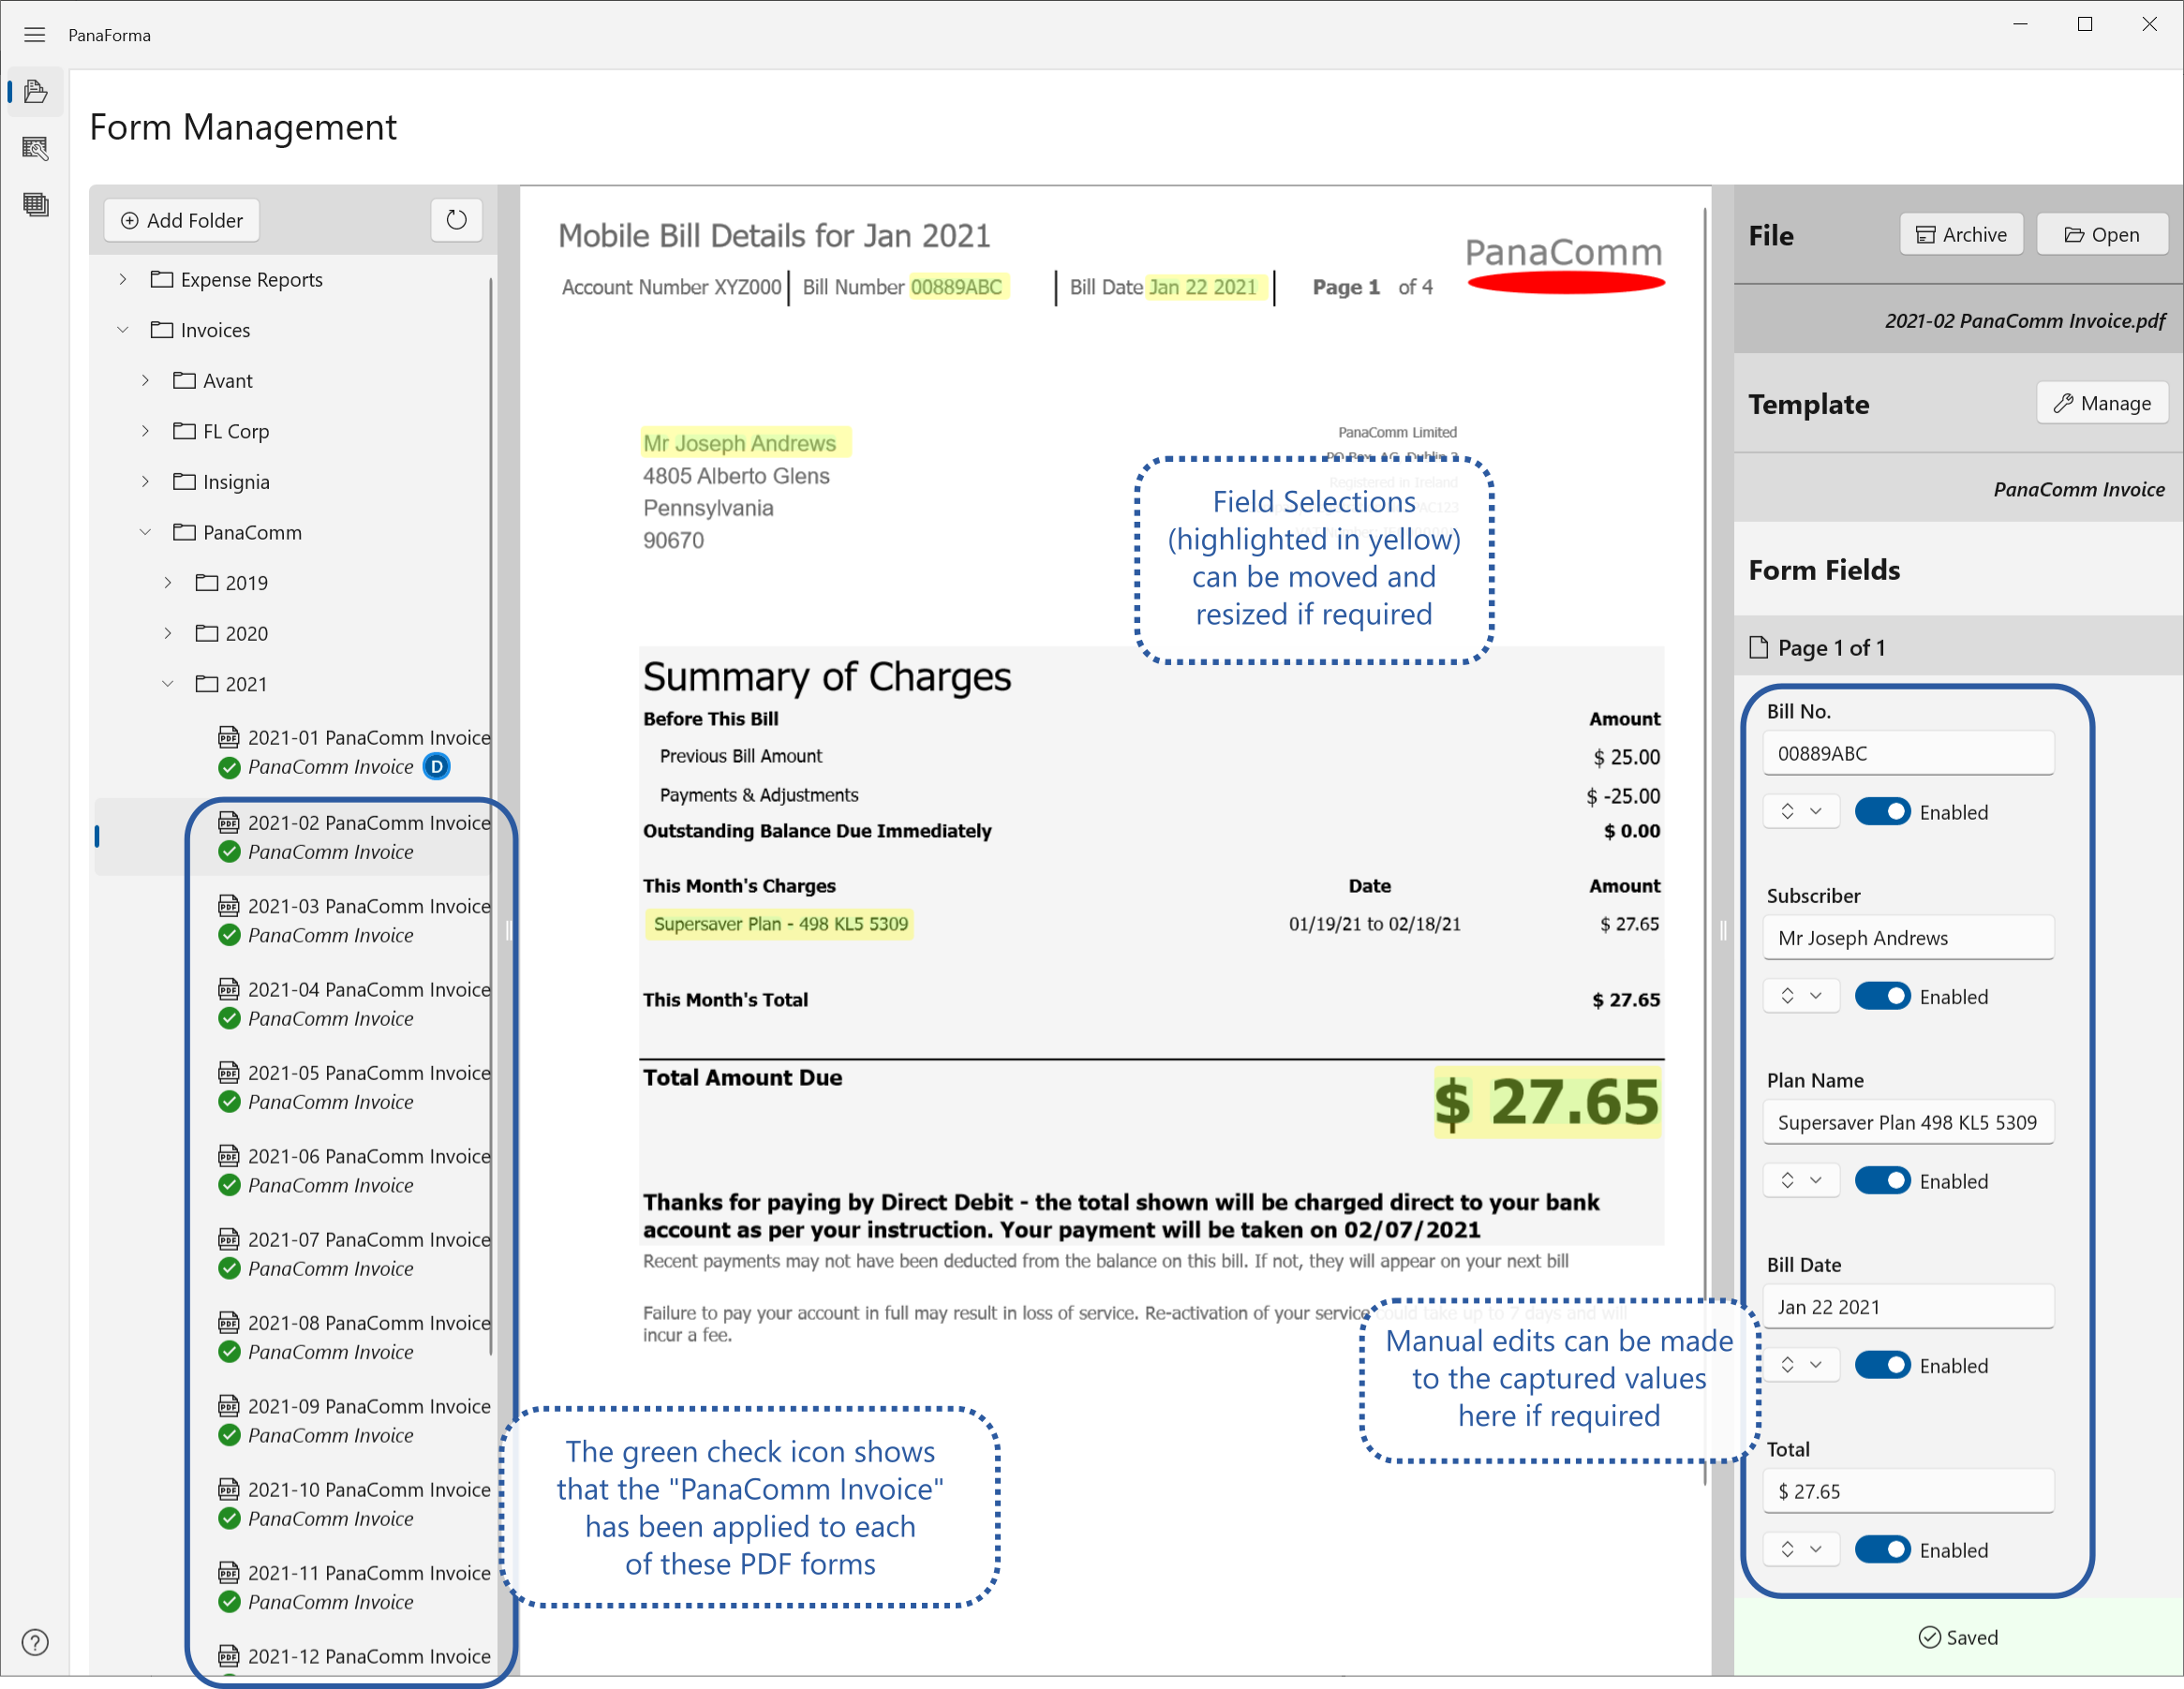
The Template's pre-defined Fields will be created, and the values at their locations in the PDF will be captured automatically. You can manually edit a captured value in the right panel, or if you don't want to capture a particular Field from the form, you can set it as Disabled. You can also move and resize the Field selection boxes on the PDF pages if necessary.
Note: Unlike on the Default Form Template PDF you cannot create new Field selections, or mark Fields as archived, or rename a Field on a non-Default form. As these actions affect the Template definition itself, they may only be done on the Template's Default form.
On PDF form files with Templates applied that are non-Default, you have the option of removing the Template from the form, or of making the form the new Default form for the Template. Click the “Manage” button on the right panel to open the Template management options.
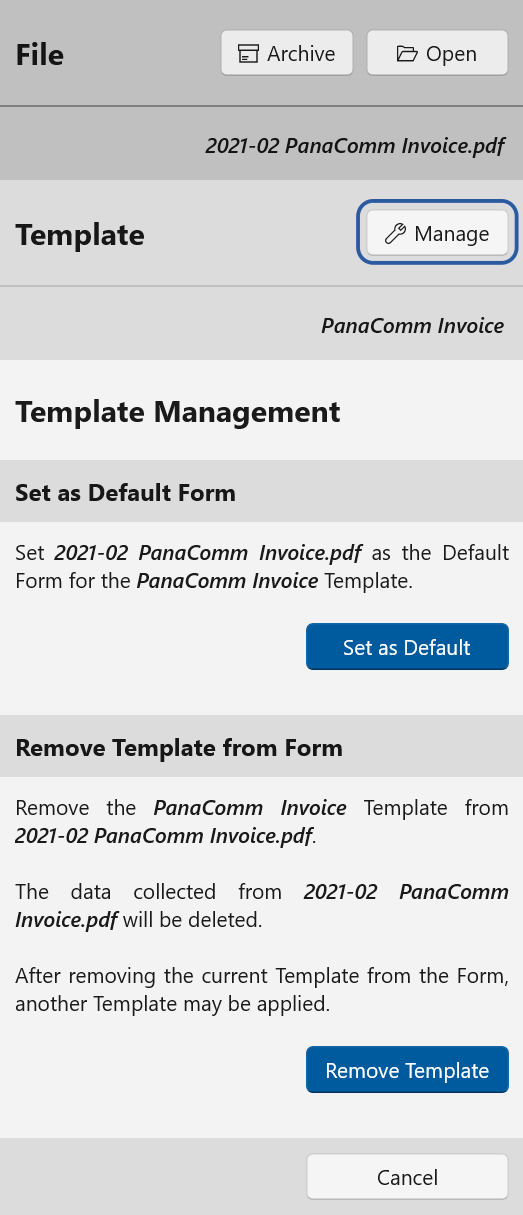
On this panel, you may mark the current form as the Default Form for Template. You might do this because the current form is a better example of the form type, and you want to use it as a basis to improve the Template. Another reason you might set a different Default Form is to allow the original Default Form to be deleted.
The second option on this panel is to remove the Template from the form. This will permanently delete the data captured from the form. You might want to do this because you no longer want the data, or because you applied the wrong Template to the form, and want to apply a different one.
Note that neither of these options are available on a Template's Default Form, as a Template must always have a Default Form. In order to apply these options to a Default Form, first set a different form as the default.
To create a Field, you must have a Template's Default PDF form file open. Click and drag a selection box on a form page to create a new Field. You will see the new Field appear in the right side panel at the same time. After creating a Field selection box, you can resize or move the box using the mouse pointer.
If you move the selection box over a different part of the page, the value captured in the right panel will change to reflect this, however it will not be saved immediately. You will see the value's text-box background turn yellow to indicate an unsaved change, and buttons will appear to allow you to Save or Cancel the change.
Note: The size, location, and name you set for a Field selection on the Default Form Template will be used on all Forms to which that Template is applied.
On non-default forms where a Template is applied, you can modify the size, location, and captured value of the Field, but these changes will only affect that non-default form. The Template definition itself will not be modified
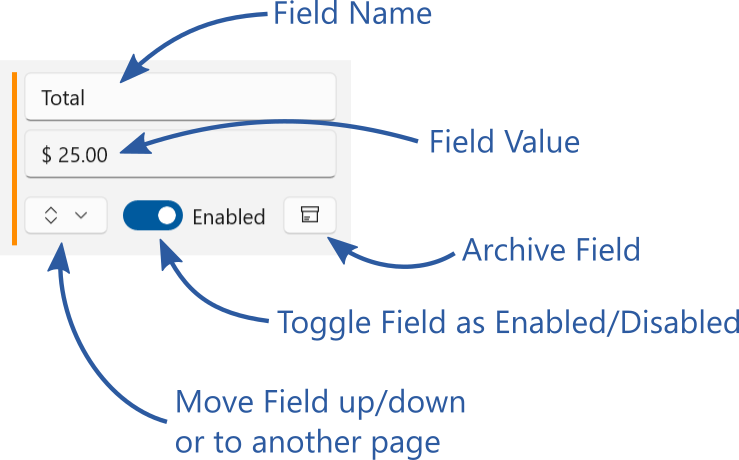
In the right panel, you can change the order in which the fields appear or move them to different pages on a multi-page PDF using the drop-down menu. You may mark a Field as Disabled, which will prevent any value being captured by the Field from the current form. Finally, you can mark the Field as Archived, which will stop it appearing on the Template and Data Extracts.
On non-default forms where a Template is applied, the options to rename or archive a Field are not available, as they would affect the Template definition itself.
The Folder Bulk Processing feature allows you to Apply or Remove Templates across all PDFs in a folder, and sub-folders, if required. To use Bulk Processing, select a folder in the folder tree on the left, as shown in the screenshot below.
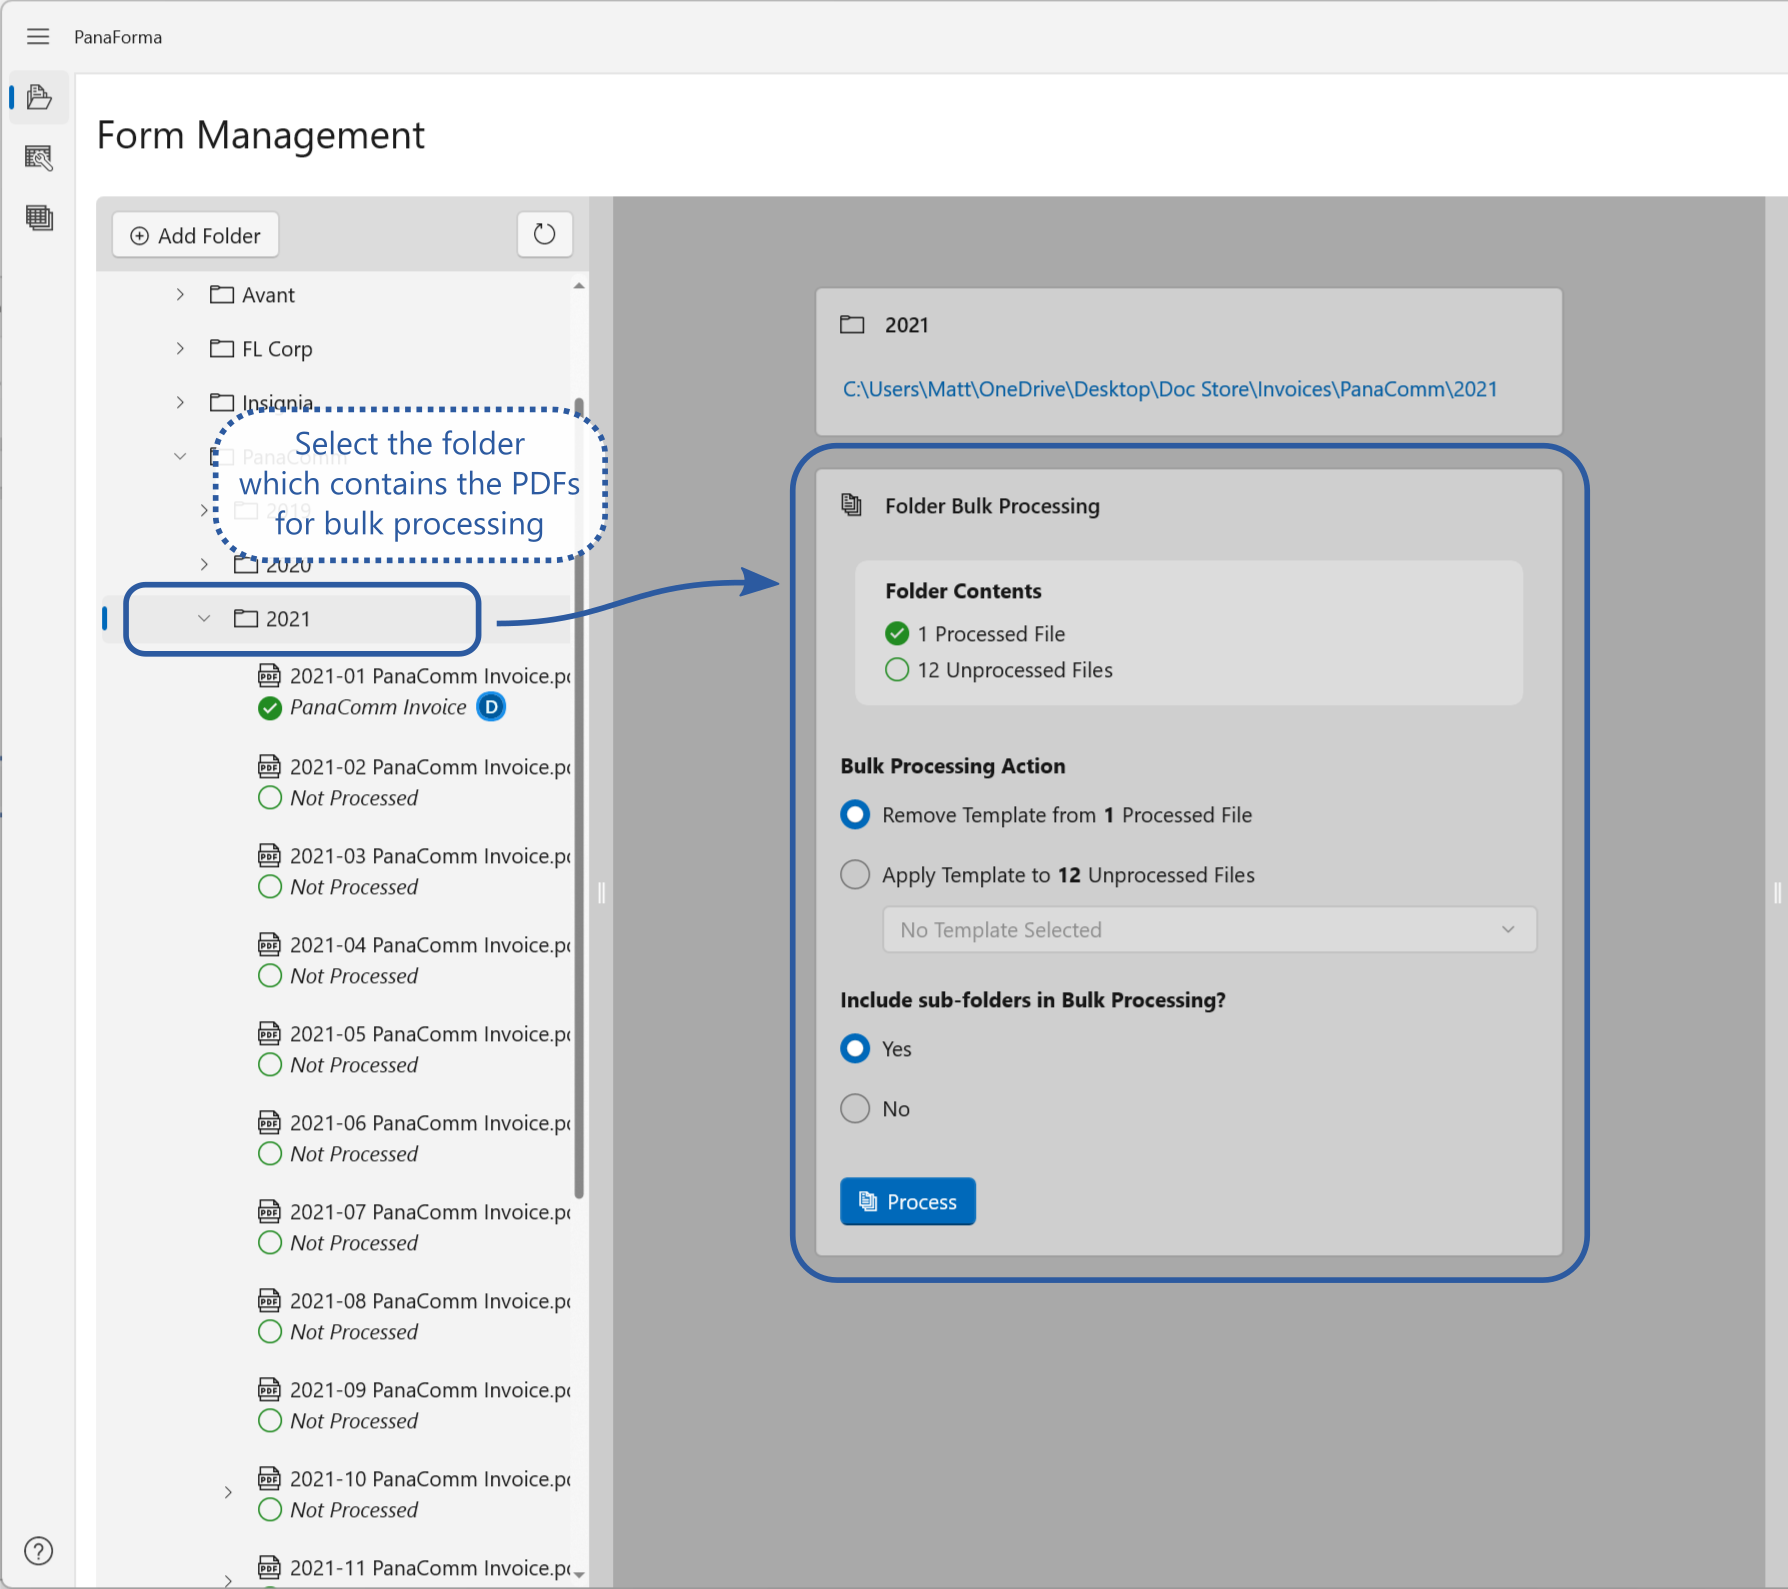
Note: When applying a Template with the Bulk Processing feature, only Unprocessed files will be affected. In the same way, when Removing a Template, only Processed files will be affected.
Also note that the Template Removal feature removes all Template types from Forms in a folder, and not just a single type.
To bulk apply a Template to all unprocessed PDFs in a folder, choose the "Apply Template..." option as the Bulk Processing Action. From the drop-down menu below the option, choose the required Template. Next choose whether you want to include sub-folders in the bulk processing action, or only want to process PDFs directly contained in the chosen folder. When you change this option, the counts of detected files at the top of the dialog may update. Verify that the number of Unprocessed files is what you expect before proceeding. Finally, click the "Process" button to apply the chosen Template to all the chosen unprocessed files.
A progress bar will show which file is currently being processed. When the action is complete, a confirmation message will appear, and the file counts at the top of the dialog will be updated.
After applying a Template with bulk processing, review the data in the "Data Extracts" screen to verify that all required data was extracted as expected. If there are variations in page layouts in some of the PDFs, manual intervention may be necessary to update values or to move field selections on pages into the correct positions.
To bulk remove Templates from all processed PDFs in a folder, choose the "Remove Template..." option as the Bulk Processing Action. Next choose whether you want to include sub-folders in the bulk processing action, or only want to process PDFs directly contained in the chosen folder. When you change this option, the counts of detected files at the top of the dialog may update. Verify that the number of Processed files is what you expect before proceeding. Finally, click the "Process" button to remove all Templates from the chosen processed files.
A dialog will ask you to confirm that you want to proceed - removing Templates from forms will delete the data that was extracted from those Forms in PanaForma. This cannot be undone, except by re-applying the Templates and also possibly doing manual edits on a file-by-file basis if there are variations in the layouts of the forms' pages. When the action is complete, a confirmation message will appear, and the file counts at the top of the dialog will be updated.